Introduction: The Renaissance of Pickling in Modern Culinary Culture
Pickling, once the preserve of grandmothers and farmhouse pantries, has surged back into the culinary zeitgeist. Its appeal lies not only in extending the life of seasonal produce but also in its unmatched ability to transform humble vegetables into flavor-packed accents for contemporary dishes. From tangy pickled radishes atop grain bowls to spicy kimchi supporting fusion tacos, pickling is now a playground for creativity and a badge of culinary craft. For the modern home cook, pickling offers an enticing combination of thrift, sustainability, and the chance to experiment with trending flavors—if you have the right tools, a smart approach to cost, and a sense for what’s in season.
This comprehensive guide unpacks the essentials for mastering seasonal pickling at home. We’ll explore the must-have tools (and which ones are worth investing in), break down the real costs by batch size, demystify food safety, and highlight flavor trends that will keep your pickled creations at the forefront of culinary culture. Whether you’re a newcomer looking to avoid rookie mistakes or a seasoned preserver chasing the next flavor trend, this post offers practical, actionable advice to inspire your next batch.
Essential Pickling Tools: What You Really Need
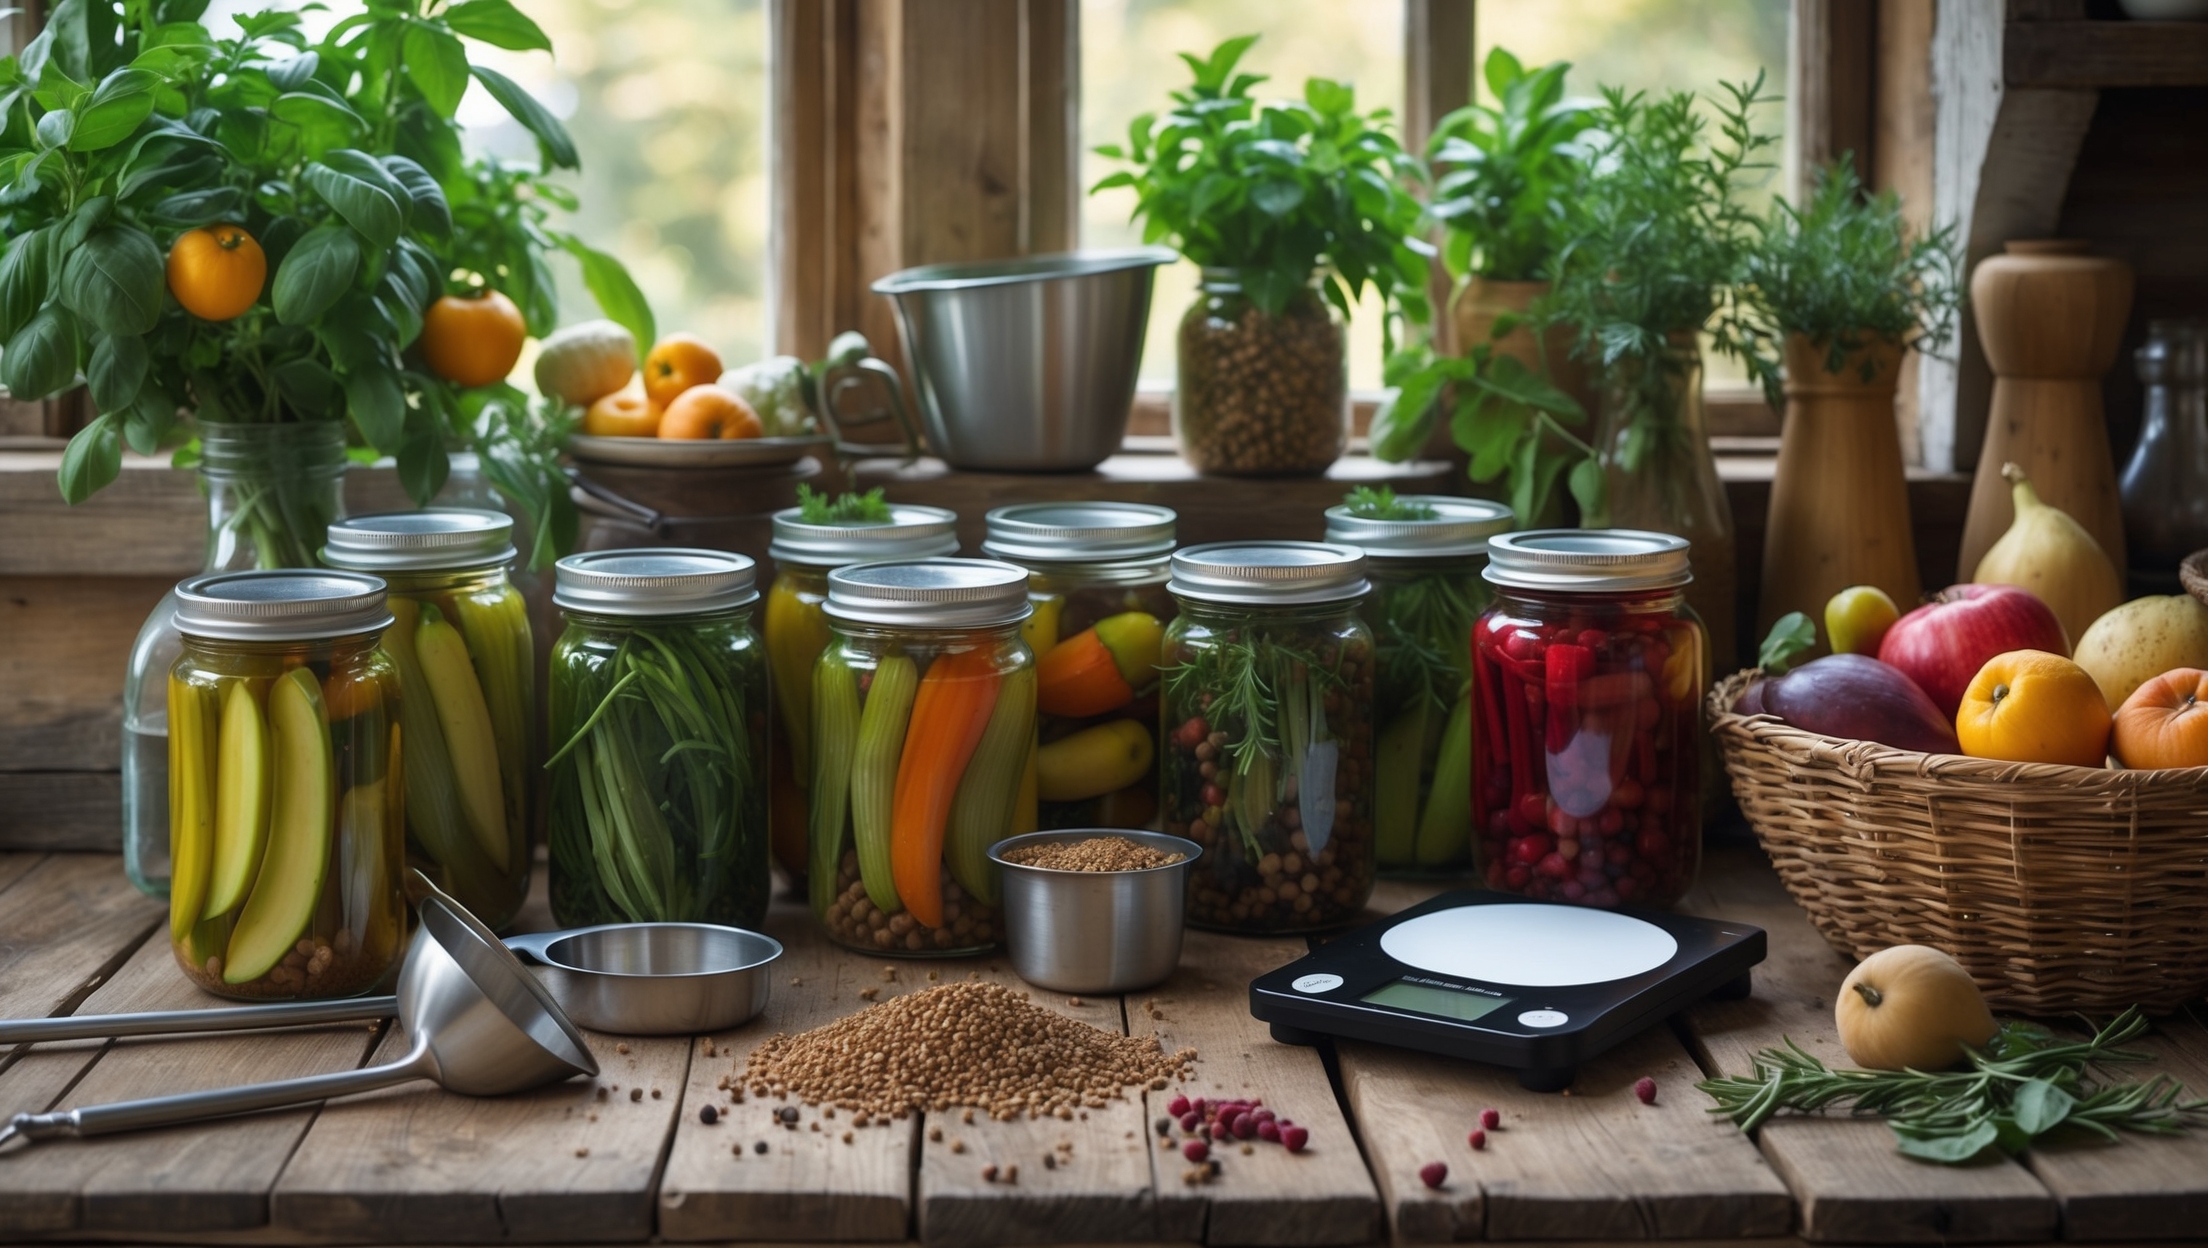
1. Glass Jars: Sizes, Shapes, and Quality
The backbone of any pickling project is the humble glass jar. For most home picklers, classic Mason jars in half-pint, pint, and quart sizes suffice. Wide-mouth jars make packing vegetables easier, while specialty shapes (like French terrines) can add panache to your pantry or gift baskets. Always opt for food-grade glass with tight-sealing, two-piece metal lids for shelf-stable pickles; for refrigerator pickles, sturdy screw-top jars work well.
- Pro Tip: Inspect jars and lids for chips, cracks, or rust. Damaged jars can compromise safety and seal quality.
2. Measuring and Mixing Equipment
Precision is key, especially when crafting brines. A digital kitchen scale ensures accuracy for salt and sugar, while liquid and dry measuring cups allow you to scale recipes up or down. A non-reactive mixing bowl (glass or stainless steel) prevents acidic brines from picking up off-flavors.
3. Funnels and Ladles
A wide-mouth canning funnel streamlines the process of filling jars neatly and safely. A heat-resistant ladle is essential for pouring hot brine, minimizing spills and burns.
4. Tongs, Jar Lifters, and Other Handling Tools
Canning tongs and jar lifters make it easy to move hot jars without risk. A magnetic lid lifter is a small but invaluable tool for handling sterilized jar lids safely.
5. Brine and Pickling Equipment
- Non-Reactive Saucepan: Stainless steel or enameled cookware is best for preparing brines.
- Thermometer: Ensures brines reach the right temperature for safety and texture.
- Optional: Fermentation Weights and Airlocks for sour pickles or kimchi, to keep produce submerged and prevent contamination.
Cost Breakdown: Budgeting Your Pickling Project
1. Upfront Equipment Investment
- Jars & Lids: $1–$3 per jar, reusable but lids may need replacing ($0.30–$0.50 each).
- Funnels, Ladles, Tongs: $10–$15 for a basic set.
- Digital Scale & Thermometer: $15–$30 for reliable, home-use models.
- Non-Reactive Saucepan: $20–$40 (if not already owned).
Initial investment for a beginner’s toolkit: $50–$100, much of which is reusable across many batches.
2. Ingredient Costs: Produce, Spices, Vinegar, and Salt
- Produce: Prices fluctuate seasonally. Buy in bulk at peak season for savings. Example: Cucumbers for pickles can range from $1/lb (in season, farmers’ market) to $3/lb (off-season, grocery store).
- Vinegar: $3–$5 per quart (white, apple cider, or rice vinegar).
- Salt: $2–$4 per box of pickling/kosher salt.
- Spices: $1–$5 per batch, depending on complexity.
Example Cost per Quart: For classic cucumber pickles—$3 (produce) + $1 (vinegar) + $0.25 (salt/spices) = $4.25 per quart. Unique or organic produce increases costs, while buying in bulk and preserving seasonal gluts can reduce them.
3. Batch Size Considerations
Larger batches maximize efficiency, since brine and equipment prep time are similar for 2 or 12 jars. Factor in storage space and shelf-life when scaling up.
Seasonal Pickling: What to Preserve and When
Spring
- Asparagus, radishes, ramps, spring onions
- Try pairing with fresh dill, mustard seeds, and citrus zest for bright flavors.
Summer
- Cucumbers, green beans, okra, carrots, jalapeños
- Classic bread-and-butter pickles, spicy giardiniera, or sweet-hot peppers.
Autumn
- Cauliflower, beets, turnips, apples, pears
- Warm spices like clove, cinnamon, and star anise complement late-season produce.
Winter
- Cabbage (for sauerkraut or kimchi), root vegetables, citrus peels
- Fermented pickles and zesty marmalade-style preserves shine when fresh produce is limited.
Trending Flavors and Creative Infusions
1. Global Inspiration
- Korean Kimchi: Gochugaru, ginger, and garlic for complex, spicy ferments.
- Japanese Tsukemono: Rice vinegar, mirin, and shiso for delicate, umami notes.
- Eastern European: Dill, horseradish, and bay for robust, tangy brines.
2. Modern Mash-Ups
- Pickled Watermelon Rind: With ginger and chili, this Southern classic is making a comeback.
- Quick Pickled Red Onions: Add sumac or hibiscus for color and tartness—perfect for tacos or grain bowls.
- Fermented Hot Sauces: Combine peppers, carrots, and fruit for sweet heat with probiotic benefits.
3. Infused Brines
- Tea-Infused: Steep black or green tea in your brine for tannic complexity.
- Herbal and Citrus: Fresh thyme, rosemary, or citrus peels add aromatic lift.
- Wild Foraged: Experiment with wild garlic, ramps, or edible flowers for hyperlocal flair.
Step-By-Step Pickling Setup
1. Preparation
- Wash and sanitize jars and lids (dishwasher or boiling water).
- Prepare produce: wash, trim, slice/cut as desired.
- Assemble brine ingredients and measure accurately.
2. Packing the Jars
- Layer produce tightly but without crushing; add aromatics and spices as you go.
- Leave recommended headspace (usually 1/2 inch for shelf-stable, 1/4 inch for refrigerator pickles).
3. Making and Pouring the Brine
- Heat vinegar, water, salt, and sugar (if using) just to a boil; stir to dissolve.
- Pour hot brine over produce, covering completely.
- Use a chopstick or non-metal utensil to release air bubbles.
4. Sealing and Processing
- For shelf-stable pickles, wipe jar rims, place lids, and process in a boiling water bath for the recommended time.
- For quick or refrigerator pickles, cool jars, seal, and refrigerate immediately.
5. Labeling and Storing
- Label each jar with date and contents.
- Store shelf-stable pickles in a cool, dark place; refrigerate others.
Food Safety: Best Practices and Common Pitfalls
1. Sanitize Everything
Thoroughly wash and, where needed, sterilize jars, lids, and tools to prevent spoilage or contamination. Never reuse old lids for shelf-stable canning—always use new ones.
2. Acid Balance is Critical
For home-canned, shelf-stable pickles, a vinegar solution of at least 5% acidity is essential. Don’t dilute brines beyond tested recipes; low acid can harbor harmful bacteria.
3. Avoid Common Mistakes
- Poor jar seals (often due to debris on rims or worn lids)
- Improper brine ratios
- Inadequate processing time
- Storing in warm, bright locations (speeds spoilage)
4. Signs of Spoilage
- Bulging lids, off odors, or cloudiness indicate potential problems—when in doubt, throw it out.
Maintaining Your Pickling Tools
1. Cleaning and Storage
- Wash all tools promptly after use. Avoid abrasive scrubbers on jars and lids to prevent scratching.
- Store jars with lids off to prevent odors and moisture buildup.
2. Inspecting for Wear
- Discard any chipped glass or rusty lids/rings.
- Check seals and handles on tongs, funnels, and jar lifters annually.
Creative Uses for Pickled Produce
- As condiments in sandwiches, burgers, and wraps
- Chopped into salsas, salads, or relishes
- Finely diced in deviled eggs, potato salad, or grain bowls
- On cheese and charcuterie boards for brightness and texture
- Brine as a cocktail mixer or marinade base
Conclusion: Elevate Your Culinary Craft with Confident Pickling
The art of pickling is more alive than ever, bridging tradition and innovation on the modern table. By investing in the right tools, understanding the true costs, and following seasonal rhythms, you open a world of culinary opportunities right from your home kitchen. The satisfaction of opening a jar of jewel-toned, crisp pickles in the depths of winter—or offering a homemade, trend-forward preserve as a gift—transcends the practical. It’s an act of creativity, sustainability, and connection to both heritage and future food trends.
Remember that successful pickling rewards both attention to detail and a spirit of experimentation. Start by mastering safe, classic recipes, then gradually infuse your own personality into every batch. Let the seasons, your local markets, and global flavor trends inspire your jars. With each project, you’ll gain confidence—not just in preserving produce, but in crafting moments of flavor that linger well beyond the last bite.
So gather your jars, sharpen your palate, and join the pickling renaissance. Your pantry—and your palate—will thank you.


Could you clarify which pickling tool investments actually make a noticeable difference for beginners versus those that are more of a nice-to-have? I want to keep my initial costs low but don’t want to compromise on safety or taste.
For beginners, focus on essentials like a good-quality jar lifter, wide-mouth canning jars, and a non-reactive pot. These ensure safety and consistent results. Optional tools like mandolines or fancy fermentation weights are helpful but not necessary at first. You can always expand your toolkit as you gain experience without risking taste or safety.
I noticed you mentioned breaking down the real costs by batch size for pickling at home. Could you share a rough estimate of how much it costs to get started if I just want to try a couple of small batches, including the jars and basic tools?
If you’re starting with just a couple of small batches, you can expect to spend roughly $25–$40. This usually covers a basic set of canning jars (about $10–$15 for a 6-pack of pint jars), a starter tool kit (jar lifter, funnel, bubble remover for $10–$15), and vinegar, salt, and spices (another $5–$10 depending on quantity). If you already have some items at home, your costs could be even lower.
Can you share more details on how the costs break down for a typical batch of seasonal pickles? I’m interested in starting small and want to get a realistic sense of start-up expenses versus long-term savings for home pickling.
For a small batch (about 4–6 jars), initial costs include jars and lids ($15–$25), basic tools like a jar lifter and funnel ($10–$20), vinegar, salt, and spices ($5–$10), plus produce ($10–$20, depending on season and type). Your first batch could total $40–$75, but most tools and jars are reusable, so future batches mostly just require produce and spices. Over time, this can be much cheaper than buying artisanal pickles.
Could you give an example of how the initial equipment costs break down for someone wanting to make just small refrigerator pickles at first? I’m trying to stick to a budget and don’t want to overbuy if I don’t need shelf-stable setups right away.
Absolutely, for small refrigerator pickles you only need the basics. Expect to spend about $8–$20 on a few pint-size glass jars, $2–$5 on a funnel (optional but helpful), and around $5 on basic ingredients like vinegar, salt, and spices. Since you’re not canning for shelf storage, you can skip special canners and racks. This keeps your upfront costs low and lets you upgrade later if you stick with the hobby.
You mention flavor trends in pickling—are there specific seasonal vegetables or spice combinations that are becoming particularly popular this year with home cooks?
Yes, this year a lot of home cooks are gravitating toward pickling spring radishes, young asparagus, and summer squash as seasonal favorites. For spice combinations, bold blends like turmeric with black pepper, or ginger with chili flakes, are gaining popularity. There’s also a trend toward incorporating fresh herbs such as dill and tarragon, often paired with citrus zest for a vibrant twist.
I’m curious about batch costs—could you share more detail on how ingredient and supply expenses break down for a typical small vs. large batch? As a business owner, I want to gauge if scaling up is truly more cost-effective for pickling seasonal produce.
For small batches, ingredient costs per jar are usually higher since you’re buying smaller quantities and paying more per unit for supplies like jars, lids, and vinegar. With large batches, buying in bulk lowers the price per unit, and you can reuse or buy jars in wholesale packs. Utility costs (like water and energy) also spread out over more jars, making each jar cheaper to produce. Scaling up tends to be more cost-effective, especially if you have reliable demand and storage.
Could you elaborate on how much start-up cost I should realistically expect for a basic pickling toolkit if I’m just making small seasonal batches? I want to avoid overspending but still make sure I have the essentials.
For small seasonal pickling batches, you can get started with a very reasonable investment. The essentials include a few mason jars, a basic jar lifter or tongs, a funnel, and measuring spoons—all together, this usually costs around $30 to $50. If you already have some kitchen basics, you might spend even less. Specialty items like fermentation weights or crocks can wait until you decide to expand.
You mention breaking down the real costs by batch size for home pickling, but I’m trying to stick to a student budget. Could you give a rough estimate of what a starter set of jars and other basic tools might cost if I’m only doing small batches?
For small batch pickling on a student budget, you can usually get started with a basic set of jars (like 6 half-pint mason jars) for around $10 to $15. Essential tools—such as a jar lifter, funnel, and a basic lid kit—might add another $10 to $15. Altogether, plan for about $20 to $30 upfront, and you’ll be set for several small batches.
I’m particularly interested in experimenting with trending pickling flavors as highlighted here. Are there any resources or seasonal ingredient charts you recommend to help home cooks align their pickling projects with what’s fresh and popular throughout the year?
For seasonal pickling, many community farmers’ markets and local cooperative extensions release monthly or quarterly produce charts highlighting what’s in season. These charts can help you pick the freshest ingredients for trending pickling flavors, like spicy cucumber in summer or apple-fennel in fall. Cookbooks focused on seasonal eating or online produce calendars could also help ensure your pickling projects make the best use of what’s available each month.
You mentioned breaking down the real costs by batch size—could you give a ballpark estimate of how much it costs to make a small batch of pickles if I’m just getting started with the essential tools and a few jars?
For a small batch of pickles, starting from scratch, expect to spend around $25–$40. This includes basic tools like a jar lifter, funnel, and a pot, as well as a few jars, vinegar, salt, spices, and produce. Once you have the tools, future batches will mainly cost just the ingredients—typically under $10 per small batch.
I noticed you mentioned wide-mouth jars making packing veggies easier—are there certain vegetables where a narrow-mouth jar works better, or should I just stick to wide-mouth for everything?
Wide-mouth jars are usually more convenient for most pickled vegetables, especially larger pieces like cucumber spears or whole carrots. However, narrow-mouth jars can be handy for smaller items like green beans, okra, or asparagus because they help keep the vegetables standing upright and packed tightly. If you mostly pickle bigger vegetables, sticking with wide-mouth jars is a good option, but having a few narrow-mouth jars for slender veggies can be helpful too.
When you talk about breaking down the real costs by batch size, do you have any advice for students or people on a tight budget who want to experiment without spending too much? Are there certain tools or jar sizes that offer the best value for beginners?
For students or anyone on a tight budget, starting small is smart. Standard pint-size jars are usually the most affordable and versatile for pickling. You don’t need fancy tools—basic glass jars, a saucepan, and a funnel (optional) will do. Try pickling smaller batches with seasonal vegetables to keep costs low and reduce waste. Mason jars are widely available and can be reused, making them cost-effective for beginners.
I love the idea of experimenting with trending pickling flavors, but I always get overwhelmed by the different types of jars and lids. Is there a big difference in how well the two-piece metal lids work compared to screw-top ones for refrigerator pickles, especially in terms of freshness and convenience?
For refrigerator pickles, both two-piece metal lids and screw-top jars work well since you’re not heat-sealing or canning. Screw-top jars are especially convenient and easy to use for quick access, and they keep pickles just as fresh in the fridge over the short term. The two-piece lids aren’t necessary unless you’re doing traditional canning for shelf storage.
As a small business experimenting with seasonal pickled items, I’m curious about food safety guidelines when scaling up from home batches. Are there specific regulations or best practices I should be aware of if I want to sell pickled products at local markets?
When selling pickled products at local markets, you’ll need to follow food safety regulations, which often vary by state and locality. Common requirements include using approved, food-safe equipment, following proper sterilization and labeling procedures, and possibly having your recipes tested for acidity and shelf stability. You may also need a food handler’s license or to prepare food in a certified commercial kitchen. Check with your local health department for specific regulations and guidance before selling to the public.
I’m curious about the cost breakdown you referenced for pickling by batch size. Could you elaborate on which tools or ingredients typically drive up the price the most for beginners trying their first few jars?
For beginners pickling small batches, glass jars with proper lids are usually the biggest initial expense, especially if you buy high-quality or specialty jars. Other tools like funnels and tongs are helpful but not strictly necessary. Ingredient-wise, spices (like whole peppercorns or specialty seeds) can add up if you purchase several types at once. Vinegar, salt, and basic produce are generally affordable, so it’s mostly the startup supplies that drive up costs.
Could you break down what the real cost difference might be between making small and large batches of pickles at home, especially once I’ve already purchased the basic equipment? I’m curious if scaling up saves much money in the long run.
Once you own the basic equipment, the main costs for home pickling are ingredients like produce, vinegar, and spices. When making larger batches, you can often buy ingredients in bulk or at lower prices per unit, which reduces the cost per jar. Utility costs (like energy for boiling) also become more efficient spread out over a big batch. So, scaling up usually does save you money per jar compared to making several small batches.
You brought up breaking down costs by batch size, which is really helpful. Do you have any tips for keeping expenses down when just starting out, especially if I want to experiment with small batches before buying more specialized gear?
Starting with small batches is a smart move. You can reuse clean glass jars from store-bought foods, and stick to basic tools like a saucepan, measuring spoons, and a basic funnel. Look for in-season produce or bulk deals, which are usually cheaper. Try simple brine recipes that use pantry staples, and hold off on buying equipment like fermenting weights or airlocks until you know what you enjoy making most.
You mention breaking down the real costs by batch size for home pickling, but I’m on a really tight student budget. Could you give a rough estimate of how much the basics (like jars and starter ingredients) might actually cost for a small batch?
For a small batch, you can expect to spend about $10–$15 for basic starter ingredients like vinegar, salt, spices, and fresh produce. A pack of 4–6 mason jars usually costs around $8–$12. So in total, starting pickling with a small batch could be done for roughly $20–$30, and the jars are reusable for future batches.
I noticed you talk about breaking down the real costs by batch size. If I’m only planning to make a small batch for myself, what would you estimate the upfront cost is for all the must-have tools versus just buying pickles from the store?
If you’re pickling a small batch just for yourself, basic tools like jars, a pot, funnel, and a pair of tongs can cost around $20–$35 upfront. Store-bought pickles, by comparison, are usually $3–$6 per jar. So, the initial cost of making your own is higher, but the tools are reusable for future batches, which brings the cost per jar down over time.
You highlighted food safety and inspecting jars for damage. If I’m using older lids that aren’t rusty but have been reused a few times, is that a major risk for home pickling, or are there safe ways to reuse them for certain types of pickles?
Reusing old canning lids for pickling isn’t recommended for recipes that require airtight seals, like shelf-stable pickles, because older lids may not reseal properly and could risk spoilage. However, if you’re making refrigerator pickles that stay chilled and are eaten within a few weeks, clean, undamaged lids can be reused safely. Always check for warping or any deterioration before using them.
I noticed the article mentions breaking down the real costs by batch size for pickling at home. Could you give some actual dollar estimates for what a beginner might spend on basic tools and ingredients to get started with a small batch?
For a beginner starting with a small batch (about 4-6 jars), basic pickling tools like a starter kit (jars, lids, funnel, tongs) usually cost around $20 to $30. Ingredients like vinegar, salt, sugar, and fresh produce for a small batch may add $10 to $15, depending on your choices. Altogether, you can expect to spend roughly $30 to $45 to get started with your first small-batch pickling project.
You talked about the real costs by batch size when pickling at home—can you give a rough estimate for how much it usually costs to make a small batch versus a larger one? I’m trying to figure out if it’s really more budget-friendly compared to just buying pickles.
For a small batch of homemade pickles (about 2-3 jars), you can expect to spend around $6-10 on ingredients like cucumbers, vinegar, salt, spices, and jars. A larger batch (8-10 jars) might cost $15-25 upfront, but the per-jar price drops significantly. Homemade pickles are usually more budget-friendly per jar, especially for larger batches, and you can reuse jars for even more savings later.
You mentioned that some specialty glass jars can add to the presentation of pickles, especially for gift baskets. Are there certain brands or styles that balance aesthetics with being practical for home pickling, and do they tend to cost a lot more than standard Mason jars?
Some popular brands like Weck and Bormioli Rocco offer jars with unique shapes and attractive lids, making them great for gifting while still being practical for pickling. They generally have wide mouths and secure seals, which help with both packing and storage. These jars typically cost a bit more than standard Mason jars, sometimes around twice as much, but many home cooks find the presentation and reusable quality worth the extra expense for special occasions.
When picking vegetables for seasonal pickling, are there types that are better for beginners to avoid mistakes, or is it safe to experiment with any produce on hand as long as the jars and lids are in good shape?
For beginners, it’s easier to start with firm vegetables like cucumbers, carrots, green beans, or radishes since they hold their texture well and pickle consistently. Softer produce, like tomatoes or leafy greens, can turn mushy or spoil more easily, so they’re trickier for first attempts. Experimenting is fun, but sticking to classic, firm veggies helps ensure better results while you develop your pickling skills.
I see you suggest always checking jars for chips or rust to avoid safety issues. Is it possible to safely reuse old jars from store-bought products for home pickling, or should I only stick to new Mason jars every time?
You can reuse old jars from store-bought products for home pickling, but it’s important to inspect them thoroughly for any chips, cracks, or rust, especially around the rim. Use new lids each time for a proper seal. However, Mason jars are specifically designed for canning and are more reliable for long-term storage and safety, so they are always the safest choice.
You list inspecting jars for chips or rust as a pro tip for safety. Are there other common rookie mistakes in the pickling process that could affect both safety and flavor that a careful beginner should try to avoid?
Absolutely, a few other mistakes to watch for include not sterilizing jars properly, using improper salt (avoid table salt with additives), overfilling jars which can prevent sealing, and failing to use enough vinegar, which compromises safety. Always follow tested recipes closely, leave the recommended headspace, and ensure lids seal tightly after processing to avoid spoilage or unsafe preserves.
Can you expand on the food safety tips for those of us new to pickling? I’d love to avoid common mistakes, especially since some customers have asked about safety and shelf life when buying house-made pickled items.
Absolutely, food safety is crucial when pickling. Always use clean, sterilized jars and utensils. Choose fresh produce, and avoid any with bruises or mold. Use the correct vinegar-to-water ratio (at least 5% acidity) to maintain a safe pH. Process jars in a water bath if you’re storing them unrefrigerated. Label jars with the date, and refrigerate after opening. Discard anything with cloudy brine, mold, or off smells. These practices help ensure your pickled goods are safe and have a reliable shelf life.
I noticed you mention breaking down the real costs by batch size. Could you provide some examples of what the per-jar or per-batch costs might look like for both refrigerator and shelf-stable pickles using seasonal produce?
Certainly! For refrigerator pickles, using seasonal cucumbers, expect to spend about $5–$7 for a small batch yielding 4 jars, or roughly $1.25–$1.75 per jar. Shelf-stable pickles cost a bit more due to canning supplies and extra vinegar, so a 6-jar batch might total $12–$15, or around $2–$2.50 per jar. Costs vary by produce prices and whether you already own reusable jars and lids.
When breaking down the real costs by batch size, do you have guidance on how to calculate ingredient costs versus pricing for retail, especially if I want to scale up from home use to a small business operation?
To calculate ingredient costs by batch size, start by listing all ingredient quantities and dividing total costs by the yield per batch. For retail pricing, add packaging, labor, overhead, and a profit margin to your base cost per unit. As you scale up, buying ingredients in bulk can reduce the per-unit cost. Keep detailed records to help you adjust prices as your production grows.
You talk about flavor trends in pickling, like kimchi for fusion tacos. How do I know which flavor combinations are safe to experiment with, especially when using non-traditional ingredients? I’m worried about food safety if I start improvising.
Your concern is valid—food safety is crucial when experimenting with pickling flavors, especially with non-traditional ingredients. To stay safe, stick to tested brine ratios (usually at least 5% vinegar or salt for most quick pickles), and avoid adding low-acid items like dairy, eggs, or meat unless you’re following a researched recipe. If you’re unsure, try refrigerator pickles, which are less risky since they’re stored cold. When in doubt, consult reputable sources or extension services for guidelines on new ingredients.
The excerpt references trending flavors in pickling for modern cooks. Are there any current flavor trends you’ve seen customers especially enjoy, or unique combinations that small food businesses should consider experimenting with this season?
Customers are really enjoying pickles infused with global flavors like Korean gochugaru, Indian spices, and Japanese yuzu. There’s also growing interest in sweet-spicy blends, such as honey-habanero or maple-ginger. Unusual combinations—think fennel and orange, or turmeric and dill—are catching on, too. Small food businesses might find success by experimenting with these bold, unexpected pairings, especially those that offer both heat and subtle sweetness.
You talk about the costs breaking down by batch size, but I’m wondering roughly how much a first batch of pickles might cost for a beginner, including the must-have tools. Is it a big upfront investment if I just want to try it out with one or two jars?
Trying pickling for the first time doesn’t have to be expensive. For just one or two jars, you can expect to spend around $15 to $30, including basic tools like a jar, lid, vinegar, salt, and spices. If you already have a pot for boiling, that helps keep costs down. There’s no need to buy specialized equipment unless you plan to pickle regularly.
I’ve tried making refrigerator pickles in screw-top jars, but sometimes they don’t keep as long as I’d like. Are there specific signs I should watch for that my pickles are no longer safe to eat, or do you have tips to help them last longer?
For refrigerator pickles, watch for signs like cloudiness in the brine, change in color, unpleasant odors, or mold—these all mean the pickles aren’t safe anymore. To help them last longer, always use clean jars and utensils, ensure vegetables are fully submerged in brine, and keep the pickles refrigerated at all times. Also, avoid double-dipping or touching the pickles with your fingers, as this introduces bacteria.
I noticed you mention investing in certain pickling tools. For someone who’s only planning to do small batches with my kids a few times a year, is it really necessary to buy specialty glass jars, or will regular screw-top jars work just as well for short-term refrigerator pickles?
For small batches of refrigerator pickles made just a few times a year, regular clean screw-top jars are perfectly fine. Specialty glass jars are mainly needed for long-term canning and storage. As long as your jars seal well and are washed thoroughly, they’ll work great for short-term pickling projects with your kids.
I’m interested in experimenting with trending pickling flavors like spicy kimchi or tangy radishes. Do you have any advice for beginners on sourcing seasonal produce at its peak, or tips on which vegetables are best for trying new recipes throughout the year?
Exploring new pickling flavors is a great way to enjoy seasonal produce. For the freshest results, visit local farmers markets or join a CSA to get veggies at their peak. In spring, try radishes and asparagus; summer brings cucumbers and green beans; fall is great for carrots and cauliflower. Choose firm, unblemished vegetables for best texture and flavor in your pickles.
I’m new to pickling and noticed you mentioned both shelf-stable and refrigerator pickles. Are there specific differences in the equipment or steps I should watch for if I want to attempt both types, or is it just a matter of storage?
There are some key differences. Shelf-stable pickles require proper canning equipment, like a water bath canner and sterilized jars, to safely seal them for storage at room temperature. Refrigerator pickles are much simpler—you just need clean jars and your fridge, as they aren’t heat processed. The steps for shelf-stable pickles are a bit more involved for safety, while refrigerator pickles are quick and easy but must stay cold.
For someone new to pickling, how do you decide which trending flavors to try first? Are there any flavors that work well across multiple types of veggies, or should you tailor them specifically to what’s in season?
When starting out, it’s easier to pick a few versatile flavors like garlic, dill, mustard seeds, or peppercorns. These work well with many vegetables, from cucumbers to carrots and beans. As you gain confidence, you can experiment with trending flavors like chili or ginger. For the best results, tailor your pickling spices a bit to what’s in season, but don’t be afraid to mix and match!
When it comes to glass jars, is there a big safety or flavor difference between using classic Mason jars versus the fancier French terrines, or is it mostly about aesthetics? Are there any practical drawbacks to the specialty shapes for beginners?
There isn’t a major safety or flavor difference between classic Mason jars and French terrines for pickling, as long as the jars are properly sterilized and have airtight seals. Mason jars are often easier for beginners because their uniform shape helps with processing and stacking. Specialty shapes like French terrines can be harder to seal and may not fit standard canning equipment, so they’re best once you’re more comfortable with the basics of pickling.
I’m curious about the cost breakdown for batch sizes you referenced. Could you provide more specifics on how the initial investment in tools like jars and measuring equipment affects the total cost per batch for a beginner?
For beginners, the initial investment in tools such as jars, measuring cups, and a basic canning kit can range from $30 to $70, depending on quality and quantity. These are one-time costs. If you make a small batch (like 4-6 jars), the tool cost per batch could be around $10-$15 at first, but as you reuse your tools for more batches, the cost per batch drops significantly—just the price of produce and spices, typically $3-$8 per batch after.
When it comes to trendy pickling flavors, do you see any specific combinations gaining popularity in customer preferences lately, and is it better to focus on traditional recipes or experiment with unique spices for retail products?
Recently, flavor combinations like spicy dill, garlic ginger, and sweet chili have been gaining traction among home cooks and retail customers. There’s a growing interest in both traditional recipes and creative twists, so offering a mix can appeal to a wider audience. Experimenting with unique spices while keeping a few classic options is a smart way to satisfy both adventurous and traditional palates in retail products.
I’m interested in starting small to see if my family will actually eat homemade pickles. When it comes to batch size, do you have advice on minimizing waste or controlling costs for beginners who might not want to buy large quantities of jars and lids up front?
Starting with small batches is a smart approach. Try using clean, recycled jars from store-bought products instead of purchasing new ones. For your first run, you can make just a jar or two—enough to test your recipe and gauge your family’s interest. This limits both ingredient and supply costs while helping you avoid waste if homemade pickles aren’t a hit.
I’m new to pickling and worried about rookie mistakes—do you have tips for avoiding common food safety pitfalls, especially around using older jars or lids that might have some wear and tear?
Using older jars or lids can be risky if they’re chipped, cracked, or have rusty spots, as these flaws may prevent a proper seal and allow bacteria to grow. Always inspect jars and lids carefully before use—discard any damaged ones. Use new lids each time you pickle, since their sealing compound degrades after one use. Sterilize all equipment before starting, and always follow trusted, up-to-date pickling recipes to ensure safe acidity levels.
As a small business owner considering offering pickled products, I would love to know more about breaking down the real costs by batch size. Do you have any example calculations or tips for tracking expenses when scaling up from home-sized to small commercial batches?
When scaling up from home to commercial pickling, start by listing all ingredients, jars, labels, and labor per batch. For example, if a 10-jar batch costs $15 in supplies and $10 in labor, each jar costs $2.50. As you buy in bulk, ingredient costs per jar often drop, but factor in new expenses like commercial kitchen rental and compliance fees. Use a spreadsheet to track each cost by batch size and update as you grow.
Can you clarify how much initial investment I should expect if I want to start pickling on a small scale for my café menu additions? I’m trying to avoid any unnecessary equipment, so a breakdown of the true must-haves versus nice-to-haves would be helpful.
For a small-scale café setup, focus on the essentials: glass jars with tight lids, a large pot for boiling, tongs, and a basic kitchen scale. These basics should cost around $40–$70. Optional ‘nice-to-haves’ like specialty fermenting lids, mandolins, or airlocks can add another $30–$50 but aren’t necessary to get started. Stick to the fundamentals, and you can expand as your menu evolves.
When you talk about breaking down the real costs by batch size, does that include the upfront investment for jars and tools, or just the ingredients? I’m trying to figure out what my first few batches might actually cost all-in as a beginner.
The article’s breakdown of real costs by batch size focuses mainly on the recurring ingredient costs, not the initial investment in jars and tools. To estimate your all-in cost for your first few batches as a beginner, you should add the one-time expense for essential equipment, like jars, lids, and basic tools, to your ingredient costs. After your first batches, only the ingredient costs and occasional replacement parts will figure into future batches.