
Introduction: The Story Behind Homegrown Bread
Imagine savoring a slice of sourdough whose journey began not in a store-bought bag of flour, but in your own backyard, as a field of golden wheat swaying in the breeze. The process of growing, harvesting, and baking with your own grain is a deep dive into culinary culture—a harmonious blend of patience, craft, and terroir. This case study follows the year-long journey of a home baker transforming a patch of garden into a mini grain field, and a handful of seeds into a loaf of artisan sourdough. Along the way, we’ll uncover hands-on tips for each step, explore the essential tools and techniques, and reveal how embracing the full seed-to-loaf cycle can deepen your appreciation for the art of breadmaking. Whether you’re dreaming of your first homegrown loaf or curious about the nuances of true farm-to-table baking, this detailed guide will inspire, inform, and equip you for your own flavorful adventure.
Planning Your Grain Patch: Selecting Seed and Space
Assessing Your Space and Soil
Grains like wheat, rye, and spelt don’t require acres of land—just a sunny, well-drained plot free from persistent weeds. A 100-square-foot patch can yield enough grain for several loaves. Before planting, test your soil’s pH (ideal: 6.0–7.0) and amend with compost to boost fertility. Avoid spots with heavy clay or poor drainage, as grains dislike wet feet.
Choosing the Right Grain
- Wheat (Triticum aestivum): Classic for bread, with hard red or white varieties best for sourdough.
- Rye (Secale cereale): Hardy, tolerant of poor soils, and imparts tangy flavor to bread.
- Spelt (Triticum spelta): Nutty, easy to grow, and popular with heritage grain enthusiasts.
Sourcing seed from local co-ops or reputable online suppliers ensures you start with disease-free, regionally adapted varieties. Consider winter wheat for fall sowing and summer harvest, or spring wheat for climates with cold winters.
Planting and Growing: A Seasonal Checklist
Timing Your Planting
- Winter Wheat: Sow in late fall, 4–6 weeks before first hard frost.
- Spring Wheat: Plant as soon as soil can be worked in spring.
Broadcast seed evenly and rake in to a depth of 1–2 inches. Aim for about 2 pounds of seed per 1,000 square feet. Lightly tamp the soil for good seed-to-soil contact.
Maintaining Your Mini Grain Field
- Weed Control: Keep young plants weed-free by hand-pulling or shallow hoeing in the first month.
- Watering: Grains are drought-tolerant but benefit from deep watering during dry spells, especially at germination and heading stages.
- Pest Watch: Look for aphids, rust, and mildew; remove diseased plants promptly and encourage beneficial insects.
Grains require little feeding beyond initial compost, but a side-dressing of organic fertilizer at tillering (when plants begin to branch) can boost yield.
Harvesting and Processing: From Field to Flour
When and How to Harvest
Harvest timing is crucial. Wait until heads are golden and grain is hard—test by biting a kernel, which should be firm, not milky. On a dry day, use garden shears or a sickle to cut stalks just above ground level. Bundle into small sheaves and let dry in a well-ventilated area for 1–2 weeks.
Threshing and Winnowing
- Threshing: Loosen grain from chaff by beating bundles against a clean surface or treading gently with clean feet (traditional, effective, and fun!).
- Winnowing: Pour threshed grain from one container to another in a light breeze or in front of a fan to blow away lighter chaff.
Repeat as needed for clean grain. Store in airtight containers, cool and dry, to prevent pests.
Milling: Choosing the Right Tool for Fresh Flour
Manual vs. Electric Mills
- Manual Mills: Affordable, portable, and ideal for small batches (e.g., Country Living Grain Mill, WonderMill Junior).
- Electric Mills: Faster, require power, suitable for regular baking (e.g., Mockmill, Nutrimill).
For the freshest flavor, mill only as much as you need for each bake. Store extra flour in the fridge or freezer to preserve nutrients.
Grinding Techniques
- Adjust grind settings for fine bread flour or coarser textures for rustic loaves.
- Sift flour to remove some bran for lighter bread, or use whole for maximum nutrition and flavor.
Freshly milled flour absorbs water differently than store-bought, so be prepared to adjust your recipes.
Sourdough Baking: Recipe and Techniques for Homegrown Loaf
Building a Starter from Scratch
Begin with just flour and water—your fresh milled grain contains wild yeasts perfect for sourdough. Mix 50g flour with 50g water, cover loosely, and feed daily. In 5–7 days, your starter should be bubbly and ready to leaven bread.
Basic Homegrown Wheat Sourdough Recipe
- 500g freshly milled wheat flour (sifted for lighter crumb if desired)
- 350g water (adjust as needed for dough consistency)
- 100g active sourdough starter
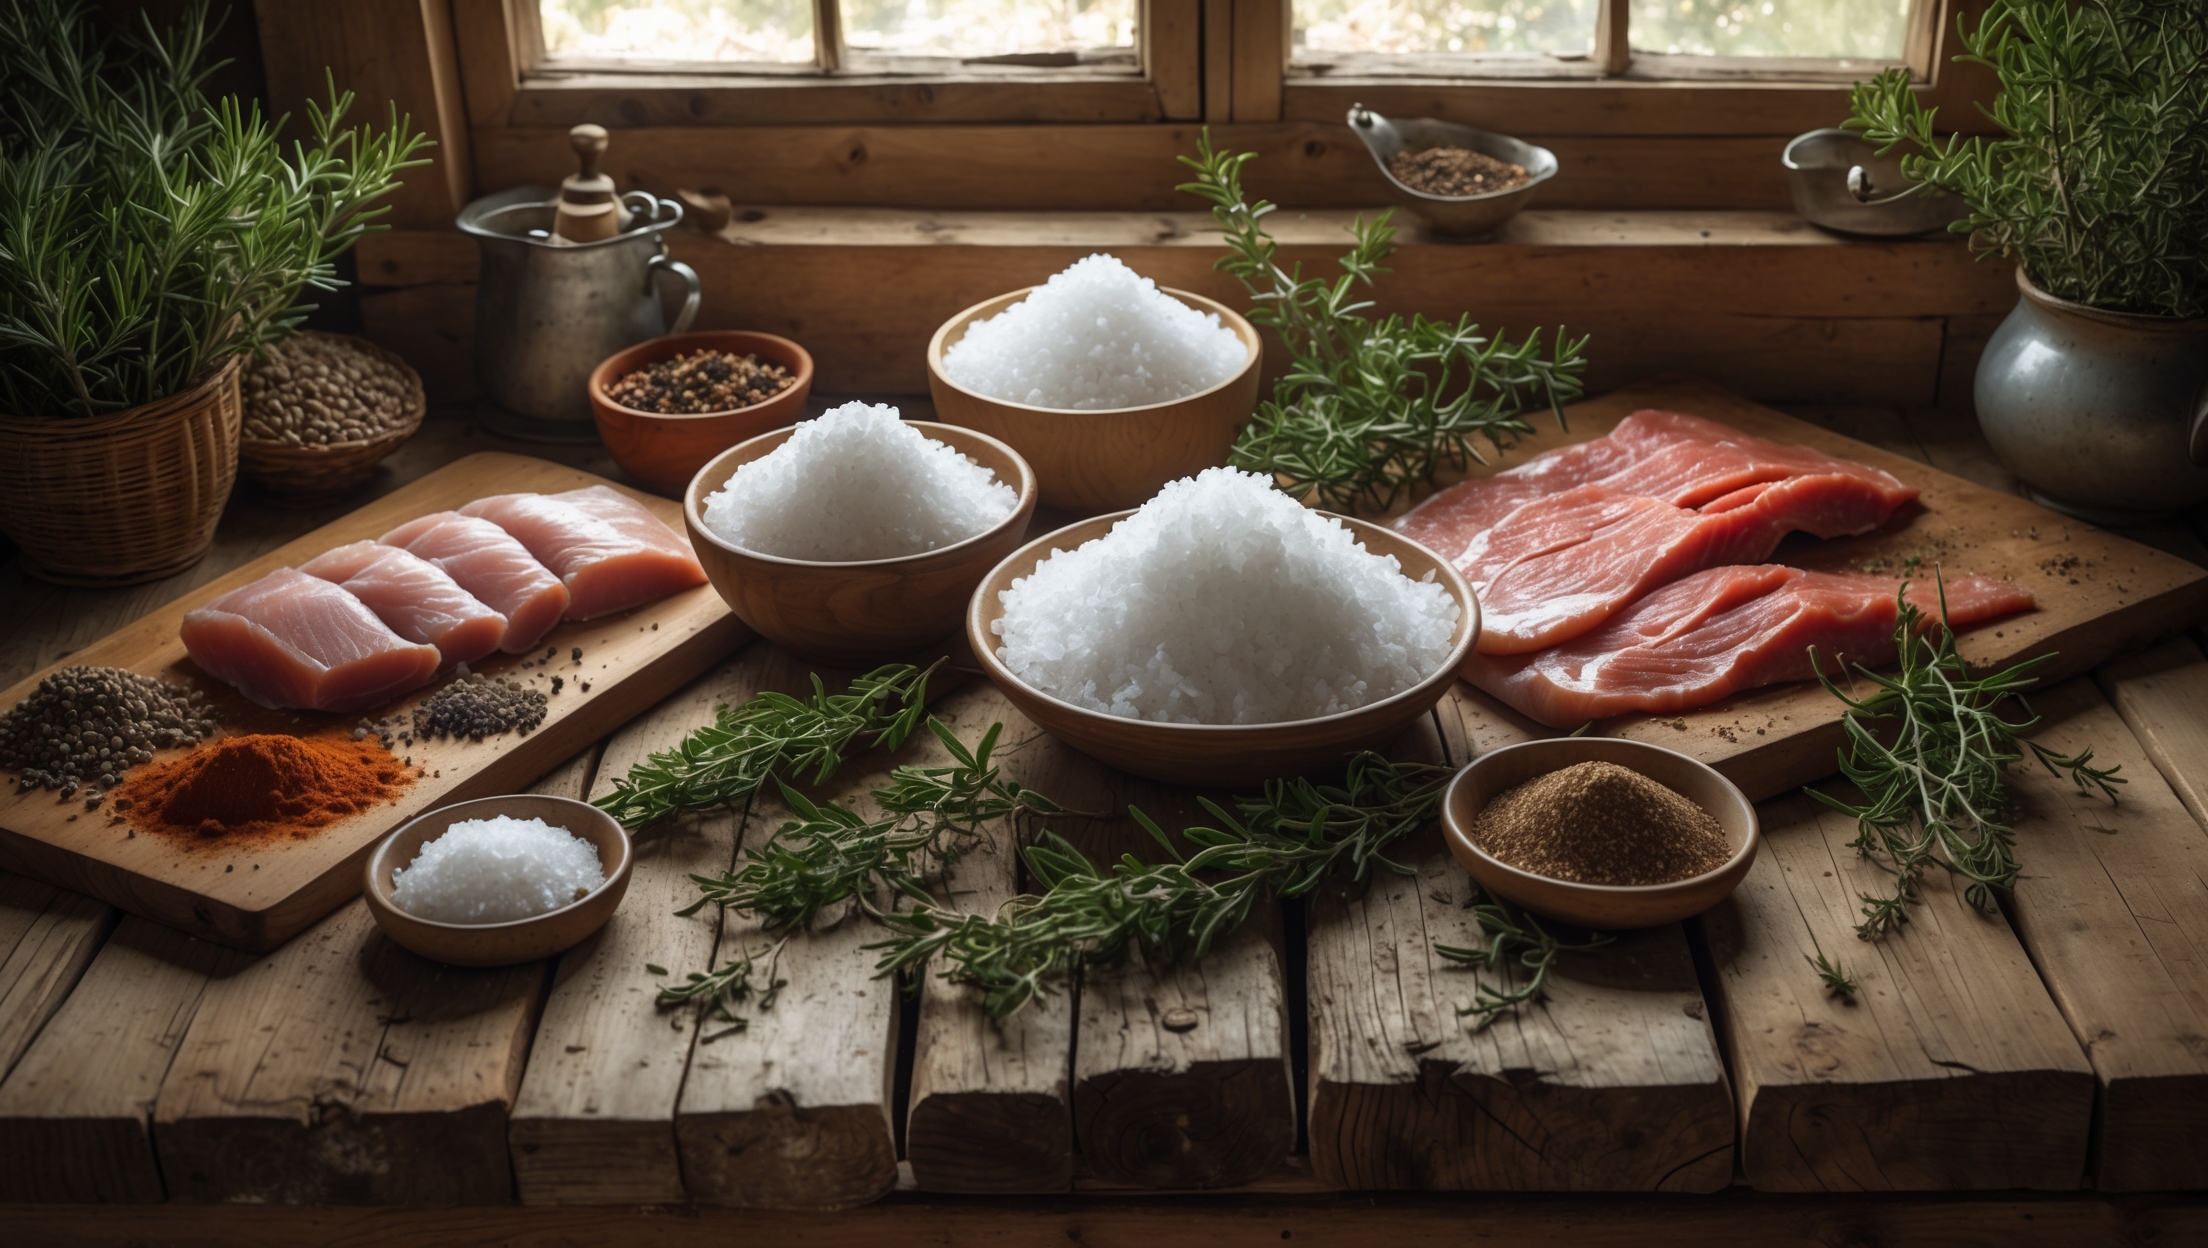
- 10g sea salt
Mix flour and water, autolyse 1 hour. Add starter and salt, knead or stretch-and-fold for 5–10 minutes until smooth. Bulk ferment at room temperature for 4–6 hours, folding twice. Pre-shape, rest 30 minutes, then final shape and proof in a floured banneton. Bake at 230°C (450°F) in a Dutch oven for 20 minutes covered, then 20–25 minutes uncovered.
Flavor and Texture Insights
Expect a deeper, nuttier flavor and chewier crumb than commercial flour. Each harvest’s terroir—soil, sun, and microclimate—imparts unique character. Experiment with blends (wheat, rye, spelt) and hydration to fine-tune your loaf to taste.
Tools and Equipment Guide: What You Need (and What You Don’t)
- Essential: Garden tools (shovel, rake, hoe), seed, compost, hand sickle/shears, food-safe containers, manual or electric grain mill, mixing bowls, dough scraper, banneton, Dutch oven or baking stone.
- Optional: Soil pH tester, kitchen scale, thermometer, proofing basket liner, sifter, pastry brush.
Start with basics and upgrade as your passion and harvests grow. Many tools can be borrowed or found secondhand.
Common Beginner Mistakes to Avoid
- Planting too densely: Crowded grains are prone to disease and low yields. Space rows 6–8 inches apart if not broadcasting.
- Underestimating birds and rodents: Netting or scare devices help protect ripening heads.
- Improper drying: Insufficient drying before storage leads to mold and spoilage.
- Skipping sifting: Home-milled flour can be heavy; sifting improves bread texture.
- Overproofing dough: Fresh flour ferments quickly—watch dough, not the clock.
Learning from these pitfalls transforms setbacks into valuable lessons for future harvests.
Budget Breakdown: Costs and Value of Homegrown Bread
Typical Costs
- Seed: $5–$15 per pound (enough for a small plot)
- Soil amendments: $10–$30 (compost, fertilizer)
- Basic tools: $0–$50 (many home gardeners already own essentials)
- Grain mill: $50–$300 (manual vs. electric)
Total first-year investment ranges from $65–$400 depending on scale and equipment. Annual costs drop after initial setup. Yield: About 10–15 loaves from a 100-square-foot patch, plus the priceless satisfaction of true seed-to-loaf baking.
Maintenance and Best Practices for Sustainable Success
- Practice crop rotation: alternate grains with legumes or vegetables to prevent soil depletion and disease.
- Save seed from healthiest plants for next year’s crop; store in cool, dry conditions.
- Clean tools after each season to prevent disease spread.
- Compost stalks and chaff to return nutrients to the soil.
- Record notes on planting dates, yields, and baking results for continuous improvement.
With each cycle, your soil and skills will improve, leading to even better bread year after year.
Conclusion: The Deeper Rewards of Homegrown Grain
Baking with homegrown grain is more than a culinary experiment—it’s a celebration of patience, resilience, and connection to the land. The journey from seed to sourdough is filled with challenges: unpredictable weather, tenacious weeds, and a steep learning curve. But each loaf you pull from the oven is a testament to hands-on craft and the nuanced flavors of your own soil. Along the way, you’ll gain a new appreciation for the farmers and millers who make bread possible, and you’ll develop a keener sense of seasonality and terroir in your own kitchen. Whether your plot yields a handful of loaves or enough to share, the act of growing, milling, and baking your own bread is profoundly satisfying. It invites you to slow down, savor the process, and enjoy bread not just as food, but as a story—your story—of taste, craft, and culinary culture. Ready to plant your patch? The adventure begins with a single seed.


I’m curious about your experience with soil prep, especially for a small backyard plot. Did you have to do much amending or weed management before planting, and how big of a difference did you notice in yield compared to store-bought flour?
For my small backyard plot, I focused on soil prep by adding compost and tilling gently to improve structure and fertility. I did need to remove grass and weeds initially, but once the grain established, it helped suppress new weeds. Amending the soil made a significant difference—my yield was noticeably better than my first attempt in unimproved soil, though still less than industrial crops. The fresh, homegrown flour had a richer flavor than store-bought, making the work worthwhile.
For someone starting out in a small backyard plot like the 100-square-foot patch you mention, how much manual labor is actually involved in harvesting and threshing the grain? Are there affordable tools you’d recommend to make those steps manageable for a home baker?
Harvesting and threshing grain by hand in a small 100-square-foot plot does take some effort, but it’s manageable for most people. Expect a few hours of work to cut the stalks with garden shears or a sickle. For threshing, you can rub the heads between your hands over a tarp or use a simple homemade threshing box. An affordable tool like a small hand-crank grain thresher or even a clean pillowcase for ‘flailing’ the grains can speed things up and make it easier.
You mentioned winter wheat is good for fall planting while spring wheat is for places with colder winters. How do you decide which one to plant if you’re in an area with unpredictable weather patterns?
When weather is unpredictable, it’s helpful to check your region’s average winter lows and first frost dates. If winters tend to get cold but not extremely harsh, winter wheat is usually reliable—just plant in the fall so it can establish roots. If late frosts or sudden freezes are common, spring wheat might be safer, since it’s sown after the risk of severe cold has passed. Some gardeners even try both types in small batches to see which performs better locally.
Could you explain a bit more about soil pH and amending with compost? If my soil tests slightly outside the 6.0–7.0 range, what’s the simplest way to correct it before planting, and how quickly can those changes take effect for a spring sowing?
Soil pH between 6.0 and 7.0 is ideal because it helps grains absorb nutrients efficiently. If your pH is slightly off, adding well-aged compost is an easy and organic way to buffer and gradually correct pH. For more immediate adjustment, use lime to raise pH or elemental sulfur to lower it, following package instructions. Most amendments start working within a few weeks, so you can safely adjust your soil in early spring before sowing.
Is it feasible to start with a smaller patch than the recommended 100-square feet, and if so, how would that impact the yield and bread-baking process? I’m working with limited space and would appreciate advice on scaling down the project while still getting meaningful results.
You can definitely start with a smaller patch than 100 square feet. A 25- or 50-square foot area will yield less grain, likely enough for just a few loaves, but it’s a great way to learn the process on a manageable scale. Just expect less flour overall, and plan your bread recipes accordingly. Even a small harvest can be rewarding and educational.
If I only have a small spot in my backyard that gets partial sun, do you think it would still be worth trying to grow wheat for bread, or should I stick to a different grain like rye that might handle tricky conditions better?
Growing wheat does best in full sun, so a small area with only partial sunlight might make it tricky to get a good yield for bread-making. Rye can be a better choice for less-than-ideal conditions and tends to tolerate partial shade and poorer soils more easily. If you’re open to it, trying rye could give you better results in your backyard spot.
When sourcing grain seed, how important is it to select a local variety versus ordering from a national supplier? Does that really make a noticeable difference in disease resistance or bread flavor, especially for a small homegrown batch?
Choosing a local grain seed variety can make a real difference, even for small home batches. Local varieties are often better adapted to your climate and may have stronger resistance to regional pests and diseases. This can lead to healthier crops and more reliable yields. Flavor can also be influenced by local conditions, so you might notice a unique taste in your bread when using locally adapted grains.
I noticed you mentioned using both winter and spring wheat depending on climate. Have you found one type to be more beginner-friendly for first-time backyard growers in the Midwest, particularly when juggling work and family life?
For backyard growers in the Midwest balancing a busy schedule, winter wheat is usually more beginner-friendly. You plant it in the fall, and it grows over winter with minimal attention, then matures in late spring or early summer. This timing spreads out the workload and often results in more reliable yields compared to spring wheat, which needs more care once the growing season begins.
You mentioned choosing between wheat, rye, and spelt for homegrown sourdough. For someone new to growing grains, which one tends to be most forgiving in terms of pests and disease, especially in a backyard setting?
For beginners growing grains in a backyard, rye is usually the most forgiving choice. It’s hardy, tolerates poor soil, and tends to have fewer issues with pests and diseases compared to wheat or spelt. Rye also grows well in cooler climates and needs less attention, making it a reliable option if you’re just starting out with homegrown grains for sourdough.
You mention testing the soil’s pH and amending with compost before planting grains like wheat, rye, or spelt. Could you provide more details on what types of compost work best and how much to incorporate for a 100-square-foot patch?
For a 100-square-foot grain patch, use well-rotted plant-based compost or mushroom compost, as these are rich in organic matter and nutrients without adding excessive salts. Spread about 2 to 3 inches of compost evenly over the soil surface, then work it into the top 6 inches using a garden fork or tiller. This will improve soil structure, moisture retention, and provide a balanced nutrient boost for grains like wheat, rye, or spelt.
For soil prep, you say to avoid heavy clay or poor drainage, but what would be the best way to improve those issues if that’s all you’ve got to work with? Are there amendments that work particularly well for growing grains?
To improve heavy clay or poorly drained soil, you can mix in plenty of organic matter like compost or well-rotted manure, which helps with drainage and soil structure. Adding coarse sand or grit can also help break up clay. Raised beds are another good option for wet areas. For grains, adding amendments like bone meal or rock phosphate can support healthy growth, but focus mainly on good drainage and organic material.
Once the grain is harvested and threshed, what equipment do you recommend for milling at home that doesn’t break the bank? Is it possible to get good sourdough results with a basic hand-crank mill, or should I invest in something more substantial?
A basic hand-crank mill can definitely get you started with home milling, especially if you’re working in small batches. Many home bakers have good results with sourdough using hand-milled flour, though it can be a workout and may take longer. If you plan to bake frequently or in larger quantities, you might consider a more robust electric mill, but for occasional use, a quality hand-crank mill should suffice.
I’m new to gardening and bread baking, so I’m wondering how realistic it is to grow enough wheat in a 100-square-foot garden to make multiple loaves. About how much flour can you actually expect to get from this size space?
With a 100-square-foot garden, you can realistically harvest about 10 pounds of wheat under good growing conditions. After cleaning and milling, this should yield roughly 7–8 pounds of whole wheat flour. That’s enough for about 8 to 10 standard-sized loaves of bread, depending on the recipe and loaf size. Factors like climate, soil, and care can affect your actual yield.
I’m curious about the actual yield you got from your 100-square-foot grain patch. About how much flour were you able to mill from that harvest, and did you find it enough for several sourdough loaves, as mentioned?
From the 100-square-foot grain patch, I harvested about 10 pounds of wheat berries. After threshing and cleaning, these milled down to roughly 8 pounds of usable flour. This amount was enough for baking around 12 to 14 sourdough loaves, depending on the recipe and loaf size. It was definitely sufficient for several batches, just as described in the article.
When you mention testing and amending the soil before planting, what specific type of compost or amendments work best for wheat versus rye? I’m worried about overdoing it and messing up the pH or drainage.
For wheat, a well-rotted compost that’s rich but not too heavy works well—aim for a loamy texture to ensure good drainage. Rye is a bit more forgiving, and can thrive in slightly poorer soils, but still benefits from compost or aged manure. For both, avoid overusing amendments with high nitrogen, as this can cause excessive leaf growth at the expense of grain. Try to keep soil pH around 6.0–7.0, and always add compost gradually, mixing it in and checking soil texture and drainage as you go.
After harvesting the grain from a home patch, what are the essential steps and tools for cleaning and milling it for breadmaking? I’d love to know how home bakers handle this efficiently on a small scale before getting to the baking stage.
Once you’ve harvested your grain, start by threshing to separate the grain from the stalks—this can be done by rubbing or gently beating the heads. Next, winnow the grains by tossing them in the air so the wind removes lighter chaff. For small batches, mesh sieves or a hairdryer on low can help. Finally, use a home grain mill or a sturdy hand-crank mill to grind the clean grain into flour. These simple tools and steps make small-scale breadmaking manageable for home bakers.
I saw you mentioned testing soil pH and using compost before planting. If my soil isn’t ideal, can I still grow decent wheat or rye, or would I need to invest in a lot of amendments to get good results?
You can still grow wheat or rye in less-than-ideal soil, but results may vary. Both grains are fairly resilient, especially rye, which tolerates poorer soils better than wheat. Small improvements like adding compost can help, but you don’t necessarily need heavy amendments right away. Start with what you have, monitor your plants, and adjust gradually as you learn what your soil responds to.
You mentioned soil amendments and testing for the right pH before planting. If my soil is heavy clay and the drainage isn’t great, is it possible to grow wheat at all, or would rye or spelt be more forgiving in those conditions?
You can grow wheat in heavy clay soil, but it will require significant soil improvement, like adding organic matter to improve drainage. Rye is generally more tolerant of poor drainage and heavier soils, so it might be a better choice if you’re not able to amend the clay much. Spelt is also more forgiving than wheat, but rye is the hardiest for challenging conditions.
I’m really interested in trying to grow my own wheat for sourdough, but I only have a small backyard. The article mentions a 100-square-foot patch—about how many loaves could I expect to bake from that, and is there a specific wheat variety that’s best for a beginner?
A 100-square-foot patch can yield enough wheat for roughly 10 to 12 standard loaves of sourdough, depending on how well the crop grows and your milling efficiency. For beginners, hard red winter wheat is often recommended because it’s relatively easy to grow, has good disease resistance, and produces flour with enough protein for hearty sourdough baking.
You mention testing the soil’s pH and amending with compost before planting. Could you give some specifics on how you tested your soil and what kind of compost or fertilizer worked best for you?
For testing soil pH, I used a simple handheld soil pH meter, which you can find at most garden centers. I took samples from several spots in the plot and averaged the readings. My soil was a bit acidic, so I added well-rotted homemade compost, which improved both texture and fertility. Occasionally, I used organic chicken manure pellets for extra nutrients, especially before planting. This combination worked well for supporting healthy grain growth.
After harvesting your grain, what kind of home-scale equipment did you use for threshing and winnowing? Was it necessary to invest in any special tools, or can a beginner get decent results with basic household items?
For threshing, I used basic methods like rubbing the grain heads between my hands and gently beating them inside a pillowcase to separate the kernels. For winnowing, a simple household fan and large mixing bowls worked well to blow away the chaff. No special tools were required—beginners can definitely achieve decent results using common kitchen items, especially for small batches.
For those interested in growing their own wheat or rye, how do you recommend managing persistent weeds organically throughout the season, especially given the relatively small size of a 100-square-foot grain patch?
For a 100-square-foot grain patch, hand weeding is practical and highly effective. Mulching around the edges with straw or grass clippings can suppress weed growth, and regular shallow hoeing between rows helps stop weeds before they get established. Rotating grains with cover crops like clover between seasons can also improve soil health and outcompete weeds organically.
When you say a 100-square-foot patch yields enough grain for several loaves, about how many loaves should I realistically expect? Also, does the type of grain—like wheat vs. rye—make a big difference in the amount you can harvest from that space?
A 100-square-foot grain patch typically yields enough for 8 to 12 standard loaves of bread, depending on growing conditions and grain variety. Wheat generally produces a bit more per square foot than rye, but the difference isn’t huge. Expect wheat to be slightly more efficient, while rye can thrive in less-than-ideal soil. Your final yield will also depend on how thoroughly you thresh and mill the grain.
For a beginner looking to try homegrown wheat, would you recommend starting with winter wheat or spring wheat if the local climate has unpredictable cold snaps? I’d like to pick the option that’s most forgiving for a first-time crop.
Given your climate with unpredictable cold snaps, spring wheat is generally more forgiving for beginners. Winter wheat is planted in the fall and relies on steady winter conditions, so surprise freezes or thaws can affect it. Spring wheat is planted after the last frost in spring and matures in warmer weather, making it a safer bet for your first crop.
For someone new to growing their own grains, what would you say is the most challenging part of the seed-to-sourdough process? Is it the soil prep, dealing with pests, harvesting, or maybe the milling for baking?
For most beginners, harvesting and processing the grain tend to be the trickiest parts. Getting the timing right so the grains are mature but not lost to birds or weather can be stressful. Then, threshing and cleaning the grain by hand takes patience and effort. Milling can also be challenging, but the real learning curve usually comes with the harvest and post-harvest handling.
If I want to try growing both wheat and rye in the same season, are there any important differences in how I should prepare the soil or space the rows? I’m struggling to decide which one would be more forgiving for a first-time gardener.
Wheat and rye are fairly similar in soil preparation—both do best in well-drained, fertile soil, but rye is generally more tolerant of poor soils and colder conditions. For spacing, wheat typically needs rows about 6-8 inches apart, while rye can be spaced a little wider, around 8-10 inches. If you’re new to grain growing, rye is usually more forgiving and resilient for beginners.
I noticed you mentioned using compost to boost soil fertility before planting. Are there specific types of compost or amendments you’ve found work best for growing wheat or spelt in a backyard garden?
For growing wheat or spelt, I’ve found that well-rotted homemade compost works very well, especially if it’s made from a mix of kitchen scraps and yard waste. Adding a bit of aged manure, like from chickens or cows, can also boost nitrogen. It’s best to avoid composts that are too woody, as they break down slowly and can tie up nutrients. A balanced organic compost, mixed into the top 4–6 inches of soil before sowing, usually gives great results.
You mentioned testing soil pH and using compost—did you have to do any other prep to get your garden plot ideal for grains, especially if the ground had heavy clay or drainage problems? Any troubleshooting tips would be really helpful.
In addition to testing pH and adding compost, I found it helpful to loosen the soil with a broadfork and mix in coarse sand to improve drainage, especially in areas with heavy clay. Raised beds can also help prevent waterlogging. Mulching between rows reduced compaction and kept weeds down. If you notice pooling water, creating shallow trenches to direct excess moisture away from the grain beds works well.
You mention winter wheat for fall sowing and spring wheat for colder climates. If I’m in a region with unpredictable late frosts, which type would you recommend to maximize yield and avoid crop failure, and are there particular varieties that handle erratic weather better?
In regions with unpredictable late frosts, spring wheat is generally the safer choice since you plant it after the last frost risk has passed. For added resilience, look for hard red spring wheat or varieties bred for cold tolerance and disease resistance, such as ‘Glenn’ or ‘Freyr.’ These types tend to handle weather swings better and reduce the risk of crop failure.
I’m curious—how did you decide between planting winter vs. spring wheat for your climate, and did you notice any major differences in flavor or yield that would sway a beginner one way or the other?
I chose winter wheat because our region has milder winters and reliable snow cover, which helps protect the crop. Winter wheat generally gave me a slightly higher yield and a milder, sweeter flavor in bread compared to spring wheat, which was nuttier but had a lower yield. For beginners, I’d recommend winter wheat if your winters aren’t too harsh, since it’s a bit more forgiving and productive.
The article mentions sourcing seed from local co-ops or online suppliers. Do you have any advice for someone on a tight budget who wants to get started—are there certain grains that are more affordable or reliable as a first-time crop?
If you’re looking to start growing grain on a budget, wheat and oats are often the most affordable and forgiving choices for beginners. Both have seeds that are widely available at reasonable prices, especially if bought in bulk from co-ops. They’re also fairly easy to grow in a range of climates. Consider starting small to keep costs down and gain experience before expanding.
You mention testing soil pH and amending with compost before planting. If my garden soil is a bit heavy in clay, are there specific amendments or grains (like rye or spelt) that might be more forgiving besides improving drainage?
If your soil is heavy in clay, incorporating organic matter like well-rotted compost, leaf mold, or coarse sand can help improve structure and drainage. Rye is indeed more tolerant of heavier soils and lower fertility, making it a great choice for clay-rich gardens. Spelt is also fairly adaptable but prefers better drainage. Focus on gradually loosening the soil over time, and consider planting rye as your first grain crop.
I’m interested in trying this at home, but I’m not sure how to choose between winter wheat and spring wheat for my first season. Can you explain the main differences in terms of flavor, care, and harvest timing for a home garden in the Midwest?
Winter wheat is planted in the fall and harvested in early summer, while spring wheat is planted in early spring and harvested later in the summer. Winter wheat tends to have a milder flavor and usually yields more, but it needs to survive the winter cold. Spring wheat has a nuttier, more robust taste and can be less risky if harsh winters are a concern. For the Midwest, either can work—choose based on your planting schedule and whether you’re ready to plant in fall or spring.
For someone working with a pretty small backyard, is a 100-square-foot patch really enough to yield several loaves? Would planting winter wheat versus spring wheat make a big difference in output or flavor if the garden is limited on space?
A 100-square-foot patch can definitely yield enough grain for several loaves—often between 5 and 10, depending on growing conditions and variety. Winter wheat generally produces a higher yield than spring wheat, which can be useful when space is limited. In terms of flavor, both types can make delicious bread, but winter wheat tends to have a milder taste, while spring wheat may have a slightly nuttier profile.
I noticed you mentioned choosing between wheat, rye, and spelt. From your experience, does one grain offer a more manageable growing and baking process for beginners trying their first homegrown sourdough loaf?
If you’re just starting out, wheat tends to be the most manageable grain for beginners, both in growing and baking. It’s relatively easy to cultivate, has a good yield, and performs reliably in sourdough recipes. Rye and spelt can be more challenging—rye is prone to weeds and spelt’s hulls are tough to remove. I’d suggest starting with wheat for your first homegrown sourdough project.
I’m new to gardening and breadmaking, so I’m curious about how much work goes into maintaining a small 100-square-foot grain patch during the growing season. Are there common issues like pests or weeds I should be ready for? How much time per week might I need to set aside?
Maintaining a 100-square-foot grain patch is doable for beginners, but it does require some regular attention. Expect to spend about 2–4 hours per week during the growing season. The main tasks are weeding, watering (especially in dry spells), and keeping an eye out for pests like birds or insects. Weeds are a common issue and need regular removal. With a little planning, it’s manageable and quite rewarding.
I’m interested in trying rye since you said it’s more tolerant of poor soils. Would I need to prepare my garden differently compared to wheat or spelt, particularly if my space has a bit of clay content?
Rye is indeed more forgiving in poor or heavier soils, including those with some clay content. You don’t need to make major changes compared to planting wheat or spelt. Just make sure your garden bed is well-drained and loosen the soil as much as possible to help the rye roots establish. Mixing in some compost can improve soil structure, but rye should thrive even if the clay content is a bit higher.
Sourcing disease-free, regionally adapted seeds sounds important. For someone in a humid climate, are there particular wheat or rye varieties you’d recommend? And do you have tips for avoiding common grain diseases during the growing season?
In humid climates, disease-resistant wheat varieties like ‘Jamestown’ or ‘Massey’ and rye types such as ‘Aroostook’ or ‘Spooner’ perform well. To minimize grain diseases, rotate crops, avoid overcrowding to promote airflow, and remove plant debris after harvest. Consider starting with certified clean seed from reputable local sources and monitor regularly for early signs of rust or mildew.
For a small backyard patch around 100 square feet, which grain would be easiest for a beginner to manage, especially considering things like disease resistance and the amount of manual work during harvesting and threshing?
For a 100-square-foot backyard patch, wheat—specifically hard red or hard white spring wheat—is a practical and beginner-friendly choice. These varieties tend to be more disease resistant and are relatively straightforward to grow, harvest, and thresh by hand compared to grains like oats or rye. They usually require less processing, making the entire seed-to-bread process more manageable for a first-time grower.
For someone in a cooler climate considering between winter and spring wheat, what are the main differences in care and success rates that you noticed while growing your own grain? Any advice on which is better for beginners?
When I grew my own grain, I found winter wheat generally has higher yields and better weed suppression since it’s sown in the fall and gets a head start in spring. However, it can be vulnerable to winterkill in very harsh climates. Spring wheat is less risky in cold areas but usually has lower yields and can face more weed competition. For beginners in a cooler climate, spring wheat might be a safer choice, as it’s less affected by unpredictable winter weather and easier to manage overall.
I’m curious about the actual yield you got from your 100-square-foot grain patch compared to what you expected when you started. Was it enough for several loaves as planned, or did you run into any surprises with harvesting or threshing losses?
The 100-square-foot grain patch ended up yielding a little less than I had hoped, mostly due to some unexpected losses during harvesting and threshing. I initially expected enough wheat for about a dozen loaves, but after accounting for those losses, I had enough grain for around seven to eight loaves. It was still very satisfying but definitely highlighted how much can be lost in the process!
You mention that a 100-square-foot plot can yield enough grain for several loaves. Roughly how many pounds of grain does that translate to, and is there a best practice for threshing and cleaning the harvest at home without special equipment?
A 100-square-foot plot typically yields around 8 to 10 pounds of grain, depending on the variety and growing conditions. For threshing at home, you can rub the dry seed heads between your hands or against a hard surface to separate the grain. For cleaning, try pouring the grain and chaff between two containers in front of a fan—this winnowing process lets the lighter chaff blow away while the heavier grain falls into the container.
For someone trying this for the first time, can you share how much time each week you typically spent tending the grain patch, and whether it was manageable alongside a busy family schedule?
Tending the grain patch generally took about 1 to 2 hours per week during the growing season, with a bit more time needed during planting and harvest weeks. Most tasks—like watering, checking for weeds, and monitoring growth—could be fit into short sessions a few times each week, making it manageable even with a busy family schedule.
You mentioned wheat, rye, and spelt as grain options, but I’m not sure which one would be easiest for a total beginner to manage in a small suburban yard. Is there a variety that’s more forgiving if soil or drainage isn’t perfect?
For a beginner working with less-than-ideal soil or drainage, rye is usually the most forgiving of the three. It tolerates poorer soils and variable drainage better than wheat or spelt, and it matures relatively quickly. If you’re new to growing grain in a small yard, starting with rye can give you a good chance of success even if your conditions aren’t perfect.
For a small patch around 100 square feet in a backyard, how much actual yield can I expect in terms of flour once the wheat is harvested and milled? I’m trying to gauge whether it’s enough for regular bread baking in a home bakery.
From about 100 square feet of wheat, you can typically harvest 8 to 10 pounds of grain, depending on the variety and conditions. After cleaning and milling, you’ll end up with around 7 to 9 pounds of flour. This is enough for roughly 14 to 18 standard loaves of bread, so it’s great for occasional home baking but probably not enough for regular, frequent baking in a home bakery.
I’m interested in trying rye because of its flavor and soil tolerance, but I’m worried about sourcing seeds locally. Are there specific signs I should look for in seed quality, and how do I know if a variety is well-suited to my region’s climate?
When looking for rye seeds, check that they are clean, plump, and free from mold or debris. Certified seed from local suppliers or agricultural co-ops is often reliable. To ensure a variety suits your climate, ask local farmers or your county extension office about varieties that thrive in your region. Also, look for labels or descriptions mentioning disease resistance and the recommended planting zones.
When testing soil pH for a home grain patch, do you recommend using a digital meter or are the basic test strips from garden stores sufficient? I want to make sure I start out with the right soil conditions but I’m on a bit of a budget.
For most home grain patches, basic test strips from garden stores are perfectly fine and will give you a good sense of your soil’s pH. Just follow the instructions carefully for accurate results. Digital meters can be more precise, but they’re often more expensive and aren’t strictly necessary unless you want ongoing, detailed testing. Starting with test strips is a budget-friendly way to ensure your soil conditions are on track.
I’m curious about the yield—if I dedicate a 100-square-foot patch in my backyard to wheat, how many pounds of usable flour can I realistically expect after accounting for losses during harvesting and milling?
With a well-tended 100-square-foot patch, you can expect to harvest about 8 to 10 pounds of wheat berries. After cleaning, threshing, and milling, you’ll end up with around 6 to 8 pounds of usable flour. Yields can vary based on weather, soil, and experience, but this is a realistic range for a home grower.
Once the grain is harvested, what equipment do you recommend for home-scale threshing and milling? I’m running a cottage bakery on a tight budget, so I’d love suggestions that won’t break the bank.
For home-scale threshing, many bakers use simple tools like a rubber mallet or even their feet to gently break the grain heads, then separate the chaff by winnowing with a fan or outdoors on a breezy day. For milling, affordable options include hand-crank grain mills such as the Victoria or WonderMill Junior. These are budget-friendly and reliable choices for small batches, perfect for a cottage bakery setup.
When you grew your own wheat in a 100-square-foot patch, about how many loaves of sourdough were you able to bake from the harvest? I’m trying to gauge if this yield is worth the effort for a small backyard garden.
From the 100-square-foot wheat patch, the harvest was enough for about 10 to 12 standard sourdough loaves. Yields can vary based on conditions and wheat variety, but that gives a good ballpark. It’s definitely a rewarding experience, though the effort is substantial when you factor in growing, harvesting, threshing, and milling. If you enjoy the process and want a hands-on, seed-to-loaf experience, even a small patch can be worthwhile.
You mentioned testing soil pH and avoiding spots with heavy clay when planning a grain patch. If my yard has moderately clay soil, are there specific amendments or techniques you’d recommend to improve drainage and make it suitable for growing wheat?
Moderately clay soil can be improved for wheat by mixing in organic matter like compost or well-rotted manure, which helps loosen the soil and boost drainage. You might also try adding coarse sand or gypsum to further break up compacted clay. Raised beds are another effective option, as they allow for better water movement and root growth. Regularly aerating the soil with a garden fork can also help keep it from becoming too dense.
Do you have any advice on dealing with stubborn weeds in a small grain patch? The article mentions needing a weed-free, well-drained plot, but I always seem to have trouble keeping invasive weeds at bay, especially early in the season.
Managing weeds in a small grain patch can be challenging, especially at the beginning of the season. Try shallow hoeing or hand-pulling weeds when they are young, and consider mulching between rows with straw or grass clippings to block light and suppress growth. Crop rotation and timely planting can also help by giving your grains a head start over weeds. Consistency is key—regular checks early on prevent weeds from getting established.
You mention sourcing seeds from local co-ops or online suppliers to ensure disease-free and regionally adapted varieties. Are there any particular types or brands you’ve found to be most reliable for beginners trying this for the first time in the Midwest?
For Midwest beginners, hard red winter wheat is a good starting point since it’s well-suited to the region. Seed brands like Johnny’s Selected Seeds and Great River Organic Milling have received positive feedback for quality and reliability. Local co-ops often carry varieties that are proven to work in your area, so it’s worth chatting with them to see what they recommend as well.
You mention testing soil pH and amending with compost before planting grains. Are there any specific compost ingredients or soil additives that work best for wheat, especially in regions with heavy clay soil? I’m worried about drainage and want the healthiest grain possible.
For wheat in heavy clay soil, compost made from a mix of plant materials like leaves, straw, and well-rotted manure works well, as it improves structure and drainage. Adding coarse sand or gypsum alongside compost can also help break up clay and enhance root growth. Avoid composts heavy in wood chips, as they can tie up nitrogen. Mixing in organic matter every season keeps soil friable, promoting healthier wheat.
If I want to try growing rye instead of wheat since you mention it tolerates poorer soils, would the flavor of the bread still work well for typical sourdough? Also, does rye require different planting times or care compared to wheat?
Rye is a great option for home baking, especially if your soil isn’t ideal for wheat. Bread made with rye flour will have a denser texture and a distinct, slightly tangy flavor, but it works very well for sourdough. As for planting, rye is often more cold-tolerant and can be sown in the fall or early spring, unlike wheat which usually prefers spring planting. Rye also generally requires less fertilizer and can thrive with minimal care.
You mentioned testing soil pH and avoiding spots with poor drainage—if my yard has heavy clay, are there any particular amendments or raised bed strategies you’d recommend for growing wheat successfully?
Heavy clay can make wheat challenging, but you can improve your chances with a few strategies. Mixing in organic matter like compost or well-rotted manure helps loosen clay and improve drainage. Raised beds are also a great option—use a soil blend with compost, sand, and topsoil to promote good drainage. Aim for a bed at least 8 inches deep, and ensure it never becomes waterlogged, as wheat roots require aeration to thrive.
You mentioned that a 100-square-foot patch could yield enough grain for several loaves. About how many loaves can you realistically expect from that space, and does the yield change much between wheat, rye, and spelt?
A 100-square-foot patch usually yields enough grain for 10 to 15 standard loaves of bread, depending on growing conditions. Wheat and rye generally have similar yields, though wheat can be slightly higher in ideal conditions. Spelt tends to yield a bit less than wheat or rye, partly because its hull must be removed before milling, which reduces the usable grain.
If I only have limited space, like a 10 by 10 foot area, do you recommend sticking with one type of grain for the first try, or is it possible to mix wheat, rye, or spelt in the same patch? How would that affect growing and harvesting?
With a 10 by 10 foot space, growing just one type of grain—like wheat—is usually simpler for your first attempt. Mixing grains can lead to different growth rates, disease risks, and uneven ripening, which complicates harvesting. Sticking with one variety helps you learn the basics before experimenting with mixes in future seasons.
You mention testing soil pH and amending with compost before planting grains. If my garden soil is naturally on the clay-heavy side, are there specific amendments or drainage techniques you’d recommend to give wheat or spelt a better shot at thriving?
For clay-heavy soil, improving both drainage and soil structure will help your wheat or spelt. Mixing in plenty of organic matter like compost or well-rotted manure loosens clay and boosts fertility. You can also add coarse sand or fine gravel to aid drainage. Raised beds are another helpful option, since they prevent waterlogging and allow roots to breathe. Avoid working the soil when it’s wet, as this can compact it further.
I’m in a colder region with a short summer—would you recommend planting winter wheat or spring wheat for a first-timer, and how do I know which will adapt better to my local climate?
For colder regions with short summers, spring wheat is usually the safer bet for beginners since it’s planted as soon as the soil thaws and matures over the summer. Winter wheat needs to overwinter, which can be challenging if your winters are harsh or snow cover is unreliable. Check with your local extension service or neighbors to see which wheat varieties have done well in your specific area for best results.
I’m really interested in starting a small wheat patch like the one described. When sourcing seed from local co-ops or online suppliers, are there any specific red flags or common diseases I should watch out for to avoid problems with my first crop?
When sourcing wheat seed, make sure it’s certified disease-free and intended for planting, not just consumption. Avoid seed lots with visible discoloration, mold, or a musty odor, as those can indicate fungal infection. Ask suppliers about screening for common wheat diseases like smut or bunt. Reputable vendors should provide this information and good documentation.
You mention testing soil pH and amending with compost before planting grains. If my soil is slightly acidic, say around 5.5, do you recommend adding lime, or will compost alone usually bring it into the ideal range for wheat and rye?
For wheat and rye, an ideal soil pH is usually between 6.0 and 7.0. If your soil is at 5.5, adding compost will help, but it may not be enough to raise the pH to the desired level. In most cases, incorporating agricultural lime is recommended to neutralize excess acidity. You can apply lime according to the rate specified for your soil type and test again before planting.
I’m really intrigued by starting a small grain patch like you described. If my soil is a bit more clay-heavy than ideal, are there any amendments or workarounds that could help grains like wheat or spelt still thrive?
Absolutely, clay-heavy soil can be improved for growing wheat or spelt. Mixing in organic matter like compost, well-rotted manure, or even leaf mulch helps lighten the texture and improves drainage. Adding sand or gypsum can also help break up compacted clay. Try working these amendments into the top several inches of soil before planting, and consider planting cover crops to further enhance soil structure over time.
You mention testing soil pH and amending with compost for optimal grain growth. Could you elaborate on the best way for a home gardener to perform these soil tests and recommend specific compost types or ratios that work well for wheat or spelt?
For home gardeners, soil pH test kits are easy to find at garden centers—they come with simple instructions and give a reliable reading. Aim for a pH between 6.0 and 7.0 for wheat or spelt. As for compost, well-rotted plant-based compost works best. Mix 2-3 inches of compost into the top 6 inches of soil before planting. This improves fertility and structure, helping grains thrive.
Are there budget-friendly sources for getting disease-free, regionally adapted grain seeds for beginners? Some of the online suppliers I’ve looked at are pretty pricey, so I’m hoping there are more affordable options you could recommend.
You might want to check with local agricultural extension offices, seed-saving groups, or community gardening organizations, as they often have affordable or even free seeds suitable for your region. Farmers’ markets and local seed swaps are also good options, since they usually feature varieties adapted to your climate and conditions. Connecting with other local growers can sometimes lead to seed exchanges or tips on budget-friendly sources, too.
Could you share more about testing and adjusting soil pH for a small home grain patch? I’m wondering if there are easy, budget-friendly ways to amend the soil if it’s too acidic or alkaline before planting wheat or rye.
Testing soil pH can be simple and inexpensive. Most garden centers sell basic soil pH test kits that give you quick results. If your soil is too acidic, adding garden lime is a common remedy. For soil that’s too alkaline, mixing in elemental sulfur or organic matter like compost can help. Always follow the recommended application rates and retest after a few weeks to track changes before planting your wheat or rye.
I have a small backyard and most of it only gets a few hours of sun each day. You mention grains need a sunny, well-drained plot—would planting wheat or rye still work if I can only offer partial sun, or would I be setting myself up for disappointment?
Wheat and rye really thrive in full sun, ideally getting at least 6 hours a day. With only a few hours of sunlight, you might find the plants grow weakly and yields are low or inconsistent. Rye is a bit more tolerant of partial shade than wheat, so if you want to experiment, try a small patch of rye and see how it does in your space.
You mention testing soil pH and adding compost before planting the grains. How critical is this step for beginners, and are there budget-friendly ways to amend soil if you’re starting with less-than-perfect backyard dirt?
Testing soil pH and adding compost are very helpful steps for beginners because healthy soil gives your grains the best start. However, you don’t need fancy tools or expensive amendments. Simple at-home pH kits are affordable, and kitchen scraps or grass clippings can be composted right in your backyard. Even spreading well-rotted manure or old leaves can help improve poor soil at little or no cost.
Could you give some advice on how to choose between hard red and white wheat for someone who mainly bakes sourdough at home? Are there noticeable differences in flavor or texture that might make one better than the other for beginners?
Hard red wheat tends to have a stronger, slightly nutty flavor and produces a denser crumb, which can add character to sourdough. White wheat is milder and often results in a lighter, softer loaf, making it more approachable for beginners. If you prefer a more robust, traditional flavor, try hard red. For a subtler, sweeter taste and gentler texture, white wheat is a great starting point.
You mention both winter and spring wheat as options depending on climate. If I’m in a region with unpredictable late frosts, how should I decide between the two for the best harvest and least risk?
If your area experiences unpredictable late frosts, spring wheat is typically the safer choice since it’s sown after the risk of frost has usually passed. Winter wheat is more vulnerable to damage from unexpected frosts, especially after it breaks dormancy in spring. Choosing spring wheat helps reduce the risk of frost affecting your crop and increases your chances of a successful harvest.
How much time does it typically take from planting wheat in a small backyard plot like the one you describe until you finally have enough grain for baking your first sourdough loaf? I’m trying to fit this into my family’s busy schedule and want to know what kind of seasonal commitment we’re looking at.
From planting wheat in a small backyard plot to baking your first sourdough loaf, you can expect a timeline of about 7 to 9 months. Wheat is usually planted in early spring or fall and takes 4 to 6 months to mature. After harvesting, allow a few weeks for drying, threshing, and cleaning the grain, then factor in milling and sourdough preparation. It’s a rewarding seasonal project that spans most of the year.
I noticed you mention using compost to amend the soil before planting grains. Do you have recommendations on how much compost to add per square foot or tips on incorporating it without over-fertilizing? I’m hoping to avoid excessive nitrogen since I’ve read it can affect grain development.
For homegrown grains, a general recommendation is to add about 1 to 2 inches of well-aged compost over your planting area, which works out to roughly 4 to 6 quarts per square foot. Gently mix the compost into the top 2 to 4 inches of soil. Using mature, balanced compost rather than high-nitrogen sources like fresh manure helps prevent excess nitrogen. This approach improves soil structure and nutrients without overwhelming your grains.
The article recommends testing and amending soil before planting. If my garden soil is heavy clay, are there practical ways to improve drainage enough to successfully grow wheat, or would I be better off using raised beds?
If your soil is heavy clay, you can improve drainage by adding organic matter like compost, well-rotted manure, or leaf mold and working it thoroughly into the soil. Sand or fine gravel can also help, but organic amendments are usually best for structure. Raised beds are a great alternative if improving drainage is difficult; they let you control the soil mix and depth much more easily, which can make growing wheat more reliable and straightforward.