Introduction: The Allure and Artistry of Hand-Rolled Sushi at Home
Few culinary crafts blend tradition, technique, and personal creativity quite like hand-rolled sushi, or temaki. Unlike restaurant platters or machine-pressed maki, home-crafted sushi rolls celebrate the tactile joy of rice, the snap of seaweed, and an ever-changing canvas of seasonal fillings. Whether you’re a passionate home cook or a curious beginner, learning to roll sushi by hand fosters a deeper understanding of Japanese food culture, kitchen precision, and ingredient seasonality. But while the process looks simple, home sushi often falls short due to misunderstood rice handling, subpar tools, or flavorless combinations. This in-depth guide unlocks the secrets to successful hand-rolled sushi at home, covering equipment essentials, how to select and prepare the best seasonal fillings, and expert troubleshooting for common rolling and flavor pitfalls. You’ll discover that with the right knowledge, crafting sushi at home is not only achievable—it’s a rewarding, endlessly customizable experience that connects you to centuries of culinary heritage and contemporary taste trends.
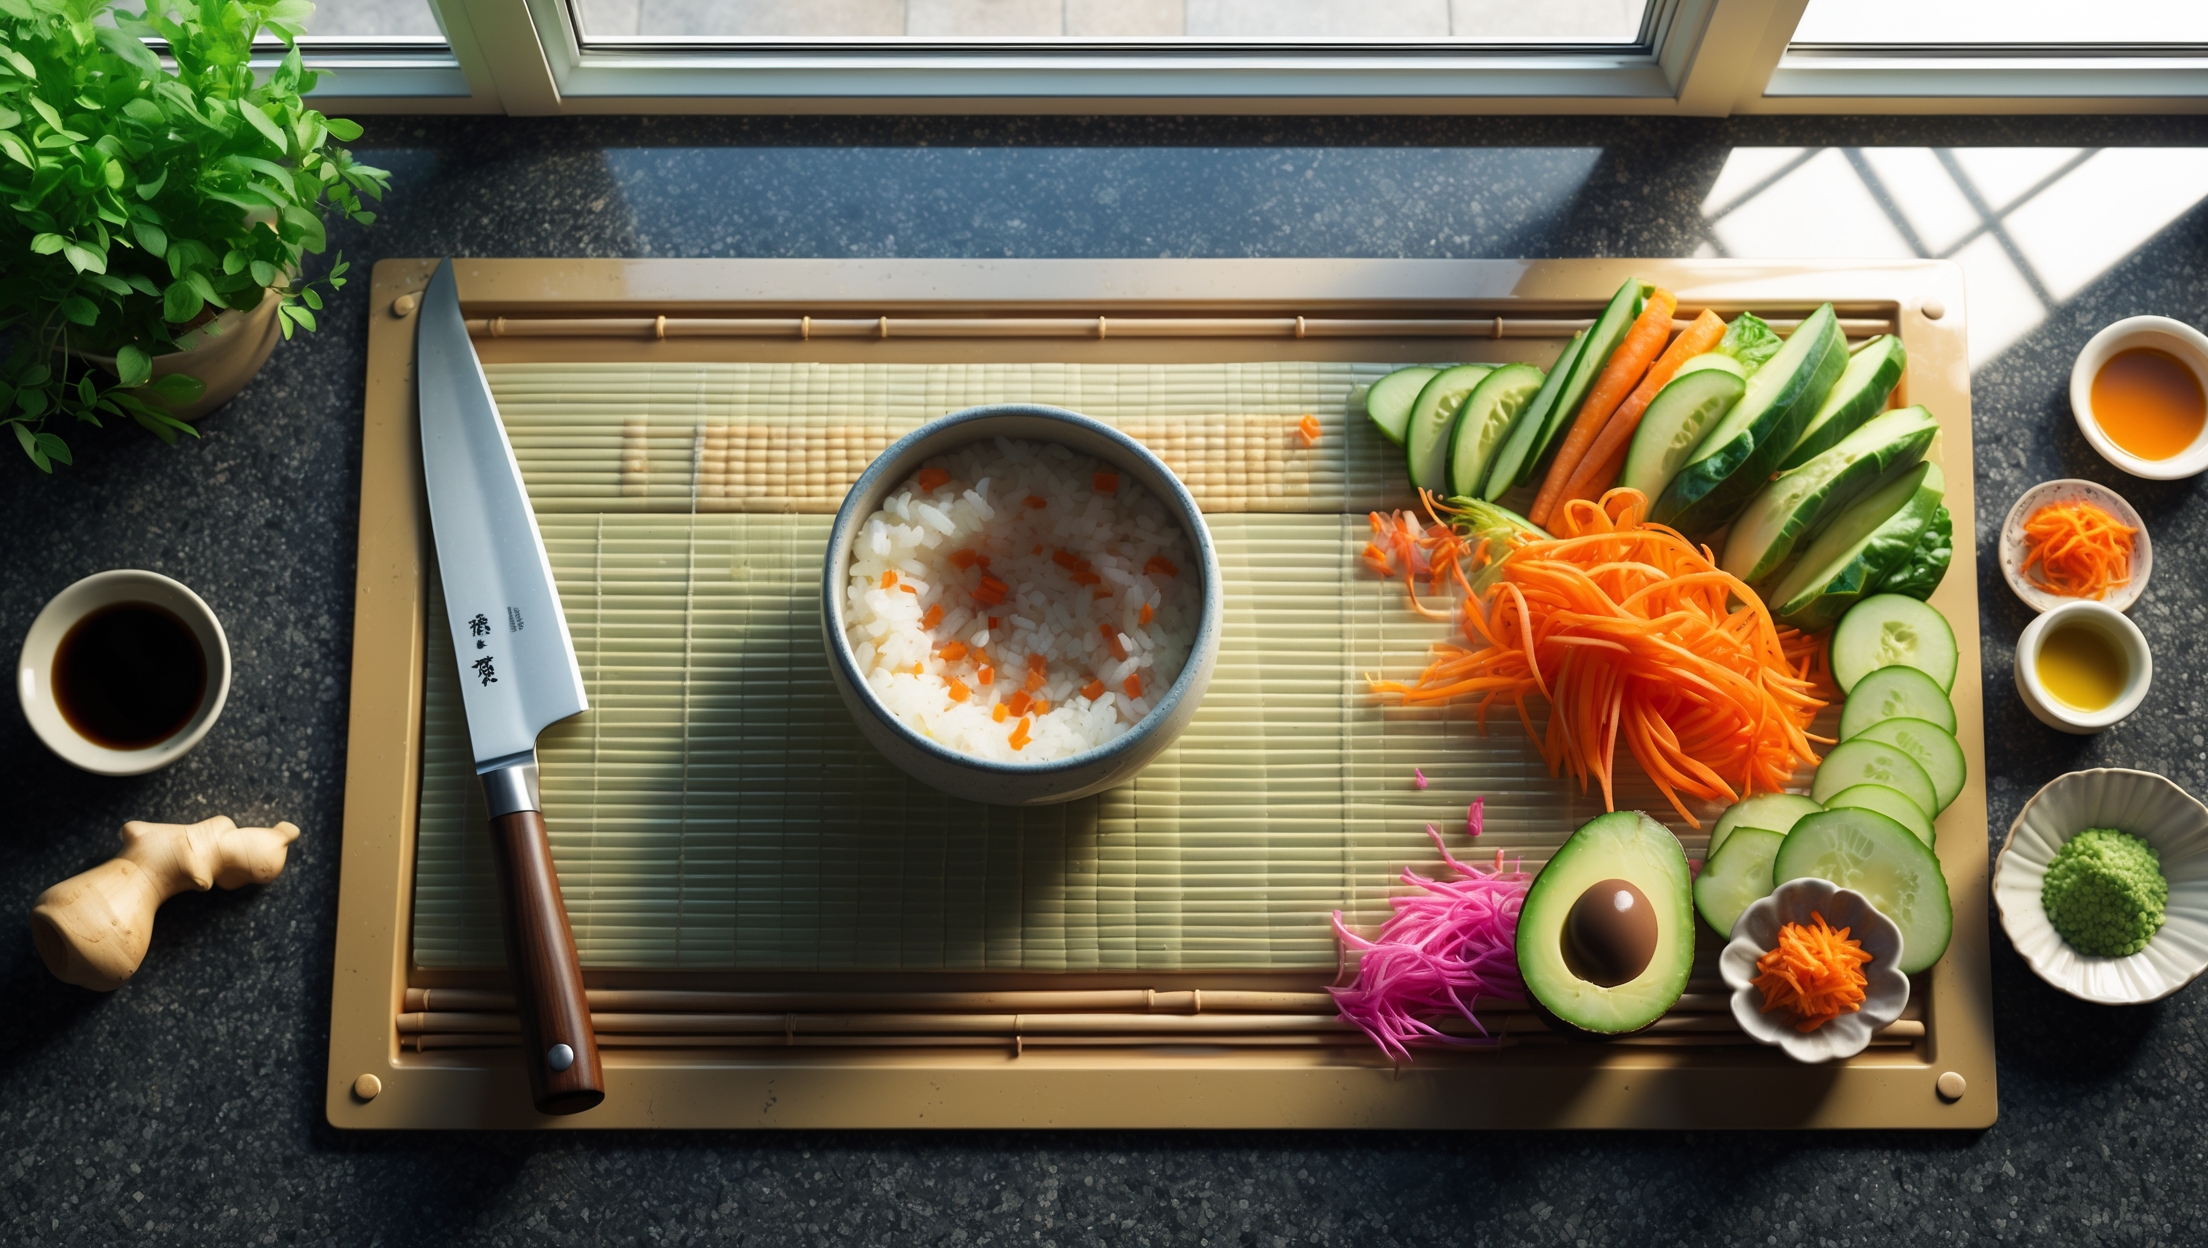
Essential Equipment for Home Sushi Rolling
Setting up for hand-rolled sushi doesn’t require a commercial kitchen, but the right equipment makes a world of difference in your results. Here’s what you’ll need, and why each tool matters.
Bamboo Sushi Mat (Makisu)
The classic bamboo mat is indispensable for shaping tight, even rolls. Choose a mat with closely spaced slats and smooth, splinter-free bamboo. Wrap the mat in plastic wrap for easy cleaning and to prevent rice from sticking.
Sharp Chef’s Knife or Sushi Knife
Clean, precise cuts ensure beautiful presentation and keep delicate fillings intact. A razor-sharp blade—ideally a thin Yanagiba sushi knife—prevents squashing and tearing. If using a chef’s knife, hone it before each session.
Nonstick Rice Paddle (Shamoji)
Evenly spreading and fluffing sushi rice requires a flat, nonstick paddle. Wooden or plastic paddles are both suitable, but always moisten before use to prevent sticking.
Hangiri (Optional but Traditional)
A wide, shallow wooden tub called a hangiri is used to season and cool freshly cooked sushi rice. The wood absorbs excess moisture, resulting in perfectly sticky yet fluffy grains. If unavailable, use a large, shallow mixing bowl.
Rice Cooker or Heavy-Bottomed Pot
Perfect sushi rice starts with consistent, even cooking. A rice cooker simplifies the process and yields consistent results, but a heavy-bottomed pot with a tight lid also works.
Other Useful Tools
- Small bowls of water and rice vinegar (for dampening hands and knife blade)
- Plastic wrap (for mat and counter cleanliness)
- Sharp kitchen shears (to trim nori sheets if needed)
- Clean, lint-free kitchen towels (for wiping hands and surfaces)
Choosing and Preparing Seasonal Fillings
One of the greatest joys of hand-rolled sushi is adapting fillings to what’s fresh and available. This section explores ingredient selection by season, alongside prepping techniques for maximum flavor and texture.
Spring: Tender Greens and Early Seafood
- Asparagus: Blanch, slice thin, and pair with lemon zest.
- Snow peas: Julienne for sweetness and crunch.
- Young carrots: Shave into ribbons, quick-pickle in rice vinegar and sugar.
- Fresh salmon: Use sushi-grade only; slice against the grain into thin strips.
- Shiso leaves: Add herbal fragrance and color.
Summer: Vibrant Vegetables and Bright Flavors
- Cucumber: Deseed, cut into long matchsticks for crispness.
- Avocado: Slice just before rolling to prevent browning.
- Mango: Thin strips add tropical sweetness; pairs well with crab or shrimp.
- Sushi-grade tuna: Quick-cure with a dusting of salt and a squeeze of lime.
- Pickled ginger: Serve on the side or as a filling twist.
Autumn: Earthy Roots and Savory Additions
- Roasted sweet potato: Dice and season with a touch of soy sauce.
- Shiitake mushrooms: Sauté in sesame oil for umami depth.
- Daikon radish: Julienne and quick-pickle for tang.
- Grilled eel (unagi): Ready-to-eat, brush with tare sauce.
- Sesame seeds: Toast for nutty aroma and texture.
Winter: Rich Seafood and Hearty Fillings
- Crab or imitation crab: Flake and mix with a touch of Japanese mayo.
- Cooked shrimp: Split and season lightly with lemon or yuzu.
- Egg omelet (tamagoyaki): Sweet-salty, sliced into thin strips.
- Spinach: Blanch, squeeze dry, season with a splash of soy sauce.
- Pickled daikon (takuan): Adds crunch and color.
Universal Pantry Staples
- Nori sheets: Use toasted, high-quality seaweed for best flavor and texture.
- Sushi rice: Short-grain, well-seasoned with rice vinegar, sugar, and salt.
- Soy sauce, wasabi, and Japanese mayonnaise: For dipping and flavor accents.
Step-by-Step: Hand-Rolling Sushi Like a Pro
Follow this stepwise approach for consistent, restaurant-worthy results—even as a home cook.
1. Prepare the Sushi Rice
- Rinse rice three to five times until water is almost clear.
- Cook rice in a rice cooker or heavy pot. Let rest 10 minutes after cooking.
- Transfer to hangiri or shallow bowl. Gently fold in seasoned vinegar mixture while fanning to cool.
- Cover with a damp towel to prevent drying.
2. Prep and Arrange Fillings
- Slice vegetables, seafood, and other fillings into long, thin strips for even rolling.
- Arrange ingredients attractively on platters for easy access.
3. Set Up Your Workspace
- Place bamboo mat (wrapped in plastic) on a clean counter.
- Keep a small bowl of cool water and rice vinegar nearby for wetting hands and knife.
- Have nori sheets, rice, and fillings within arm’s reach.
4. Roll the Sushi
- Lay a nori sheet, shiny side down, on the mat.
- With damp hands, gently press a thin, even layer of rice over two-thirds of the nori, leaving a bare strip at the top for sealing.
- Arrange a modest amount of fillings across the center of the rice. Don’t overfill.
- Using the mat, lift the edge closest to you and roll over the fillings, tucking tightly.
- Continue rolling, using gentle, even pressure, until sealed. Moisten the bare nori strip if needed to help it stick.
- Let the roll rest seam-side down for a minute before slicing.
5. Slice and Serve
- Wipe knife blade with a damp towel between cuts for clean slices.
- Arrange rolls on a platter with pickled ginger, wasabi, and soy sauce.
Troubleshooting Common Sushi Rolling Pitfalls
Even experienced cooks encounter issues—here’s how to preempt and solve the most frequent home sushi problems.
Rice Too Sticky or Dry
- Too Sticky: Rice was overcooked, under-rinsed, or too much vinegar was added. Rinse thoroughly and measure water carefully next time.
- Too Dry: Rice was over-aerated when seasoning, or the hangiri wasn’t covered. Always cover rice with a damp towel and serve promptly.
Rolls Don’t Hold Together
- Rice Layer Too Thick: Makes rolls hard to seal. Use less rice and spread evenly.
- Nori Not Sealing: Moisten the bare strip with water or vinegar for a better seal.
- Overfilling: Use fewer fillings to avoid bursting the roll.
Knife Sticking or Tearing
- Dampen blade with vinegar-water solution and clean after each cut.
- Ensure knife is extremely sharp; hone as needed during prep.
Fillings Soggy or Bland
- Pat all ingredients dry before rolling—especially pickled vegetables or seafood.
- Season fillings lightly with salt, citrus, or soy to enhance flavor.
Nori Chewy or Tough
- Use only toasted, fresh nori. Store opened packages in an airtight container with a desiccant pack.
- Serve immediately after rolling for maximum crispness.
Cost Breakdown and Budgeting Tips
Homemade sushi can be as affordable or luxe as your ingredient choices allow. Here’s how to make the most of your budget without sacrificing taste or experience.
One-Time Equipment Costs
- Bamboo mat: $5–$10
- Rice paddle: $3–$8
- Hangiri (optional): $30–$60
- Rice cooker (optional): $30–$150
- Sharp chef’s knife: Varies; invest in sharpening tools for longevity.
Ingredient Costs (per rolling session for 4 rolls)
- Sushi rice: $2
- Nori sheets: $3–$5
- Seasoning (vinegar, sugar, salt): $1
- Fillings (vegetables): $4–$8
- Fillings (seafood): $8–$20+ (choose seasonal/local options for best value)
- Condiments: $2–$4
For vegetarian or vegetable-forward rolls, expect costs to be as low as $10–$15 per session. Seafood-focused spreads may reach $25–$40, still less than restaurant prices for comparable quality and quantity.
Budgeting Tips
- Buy nori and rice in bulk for savings.
- Choose local, in-season vegetables and seafood for best price and flavor.
- Use leftovers or repurpose cooked proteins from other meals.
- Limit premium seafood to a few highlight rolls, balancing with vegetables and eggs.
Safety and Ingredient Quality Checklist
Food safety is paramount, especially when handling raw seafood. Follow these guidelines for confidence and peace of mind.
- Purchase seafood from reputable sources and specify it’s for sushi or sashimi use. Look for clear, fresh aroma and firm flesh.
- Keep seafood refrigerated at 32–38°F (0–3°C) and use within 24 hours.
- Wash hands, surfaces, and tools thoroughly before and after handling raw ingredients.
- Store nori and other dry goods airtight, away from moisture.
- Blanch or pickle vegetables to reduce microbial risk and enhance flavor.
Creative Presentation and Serving Inspiration
The final flourish elevates home sushi from simple snack to celebratory feast. Consider these ideas for memorable presentation:
- Serve rolls on rustic wooden boards or slate platters for a modern look.
- Garnish with edible flowers, microgreens, or thin lemon slices.
- Arrange rolls by color and filling for visual variety and easy selection.
- Offer small bowls of soy, wasabi, and flavored mayonnaises for dipping.
- Accompany with miso soup, pickled vegetables, or a simple sake cocktail for a well-rounded meal.
Conclusion: Elevating Everyday Meals with Hand-Rolled Sushi
Hand-rolled sushi is more than a dish—it’s an invitation to slow down, experiment with seasonal flavors, and share the creative process with friends and family. With the right equipment, quality ingredients, and attention to detail, you’ll discover that home-crafted sushi rivals—if not surpasses—restaurant fare, offering fresh textures, vibrant colors, and a sense of accomplishment in every bite. Troubleshooting pitfalls along the way builds confidence and skill, turning mistakes into stepping stones toward mastery. As seasons change, so can your fillings, keeping your sushi nights exciting and deeply connected to the rhythms of the market and garden. Whether you’re hosting an elegant dinner or enjoying a mindful solo meal, the art of hand-rolled sushi transforms humble rice and seaweed into a canvas for taste, craft, and culture. So gather your tools, embrace the process, and roll your way to a more delicious, inspired home kitchen.


When you mention selecting the best seasonal fillings, do you have any specific suggestions for beginners who might not know which ingredients pair well together, especially in the spring or fall?
For beginners, some great spring fillings are cucumber, asparagus, and lightly blanched snap peas, paired with cooked shrimp or crab. In the fall, try roasted sweet potato, shiitake mushrooms, and avocado with cooked salmon or tofu. These combinations offer good flavors and textures together. Start simple, and as you get comfortable, you can mix and match based on what’s fresh at your local market.
I understand you emphasized the importance of a sharp knife for clean cuts, but if I only have a basic chef’s knife at home, do you recommend any particular technique or way to sharpen it that gets close to the results of a Yanagiba?
If you’re using a basic chef’s knife, you can still get good results by making sure it’s as sharp as possible. Use a whetstone or a pull-through sharpener to hone the edge before slicing. When cutting your sushi roll, use a gentle sawing motion and wipe the blade with a damp cloth between cuts to prevent sticking. This helps mimic the clean cuts of a Yanagiba.
I’m just starting out and curious about sushi rice—I’ve heard it can make or break the roll. The article mentions rice handling a lot, but are there tips for making sure my rice has the right stickiness and doesn’t end up too mushy or dry?
Getting the rice right is key for sushi. After cooking short-grain sushi rice, season it with rice vinegar, sugar, and salt while it’s still warm, then gently fold without mashing. Use a fan or let it cool at room temperature—this helps achieve the perfect texture. Rinse the rice before cooking to remove excess starch and prevent mushiness. Try to use the rice soon after cooling for the best stickiness and flavor.
You mention troubleshooting common rolling and flavor pitfalls—could you clarify what the most frequent mistakes are with rice handling at home, and what specific steps beginners should take to avoid them?
The most common rice mistakes are using rice that’s too wet, too dry, or not seasoned properly. To avoid these issues, rinse sushi rice until the water runs clear, cook it with the right water ratio, and let it cool slightly before seasoning. Gently fold in rice vinegar mixture without mashing the grains. Always keep your hands slightly wet when handling rice to prevent sticking and ensure smooth rolling.
Could you expand a bit on troubleshooting rice handling issues? I always have trouble getting the texture right—either it turns out too sticky or falls apart when rolling. Do you have any specific tips for prepping or spreading the rice?
Achieving the perfect sushi rice texture can be tricky. Be sure to rinse the rice thoroughly until the water runs clear before cooking, which removes excess starch and helps prevent gumminess. After cooking, season the rice while it’s still warm and gently fold it with a paddle or spatula—don’t mash or overmix. When spreading the rice on nori, use moistened fingers to handle it lightly and avoid pressing too hard. If the rice seems too sticky, let it cool a bit longer before using.
You talk about the importance of using seasonal fillings for hand-rolled sushi. For someone in a smaller town with limited access to fresh fish, what kinds of vegetables or cooked proteins would make good substitutes during different seasons?
If fresh fish is hard to find, you can use a variety of vegetables like cucumber, avocado, bell pepper, and pickled radish all year round. In spring, try asparagus or blanched peas; in summer, thin slices of zucchini or carrot work well. For cooked proteins, consider using teriyaki chicken, cooked shrimp, canned tuna with a little mayo, or even tofu. Roasted sweet potato or omelet strips (tamago) are also great options for homemade sushi rolls.