
Introduction: The Art of Home Charcuterie Caves
Charcuterie—the ancient craft of curing, fermenting, and aging meats—has made a flavorful resurgence among culinary enthusiasts seeking both tradition and innovation. While artisan salami and prosciutto once required exclusive access to professional curing cellars, today’s savvy home cooks can recreate optimal aging environments right in their own homes. Enter the home charcuterie cave: a controlled microclimate designed to foster the slow transformation of raw ingredients into savory works of edible art.
Setting up a charcuterie cave is more than a DIY project; it’s a journey into the intersection of food science, craft, and lifestyle refinement. Unlike basic cold storage or ad hoc setups, a dedicated charcuterie cave lets you unlock consistent quality, safety, and creative freedom with every batch. Yet, embarking on this path requires more than enthusiasm—it demands a practical understanding of environmental control, precise equipment, budget considerations, and the crucial safety protocols that protect both your craft and your health.
This comprehensive guide leads you through every stage of building a home charcuterie cave, from initial planning and budgeting to sourcing essential equipment, monitoring critical parameters, and implementing rigorous food safety. Whether you’re dreaming of spicy soppressata, delicate coppa, or robust bresaola, discover how to create the ideal conditions to nurture your culinary ambitions—and savor the rewards of truly artisanal meat.
Planning Your Home Charcuterie Cave
Understanding the Charcuterie Environment
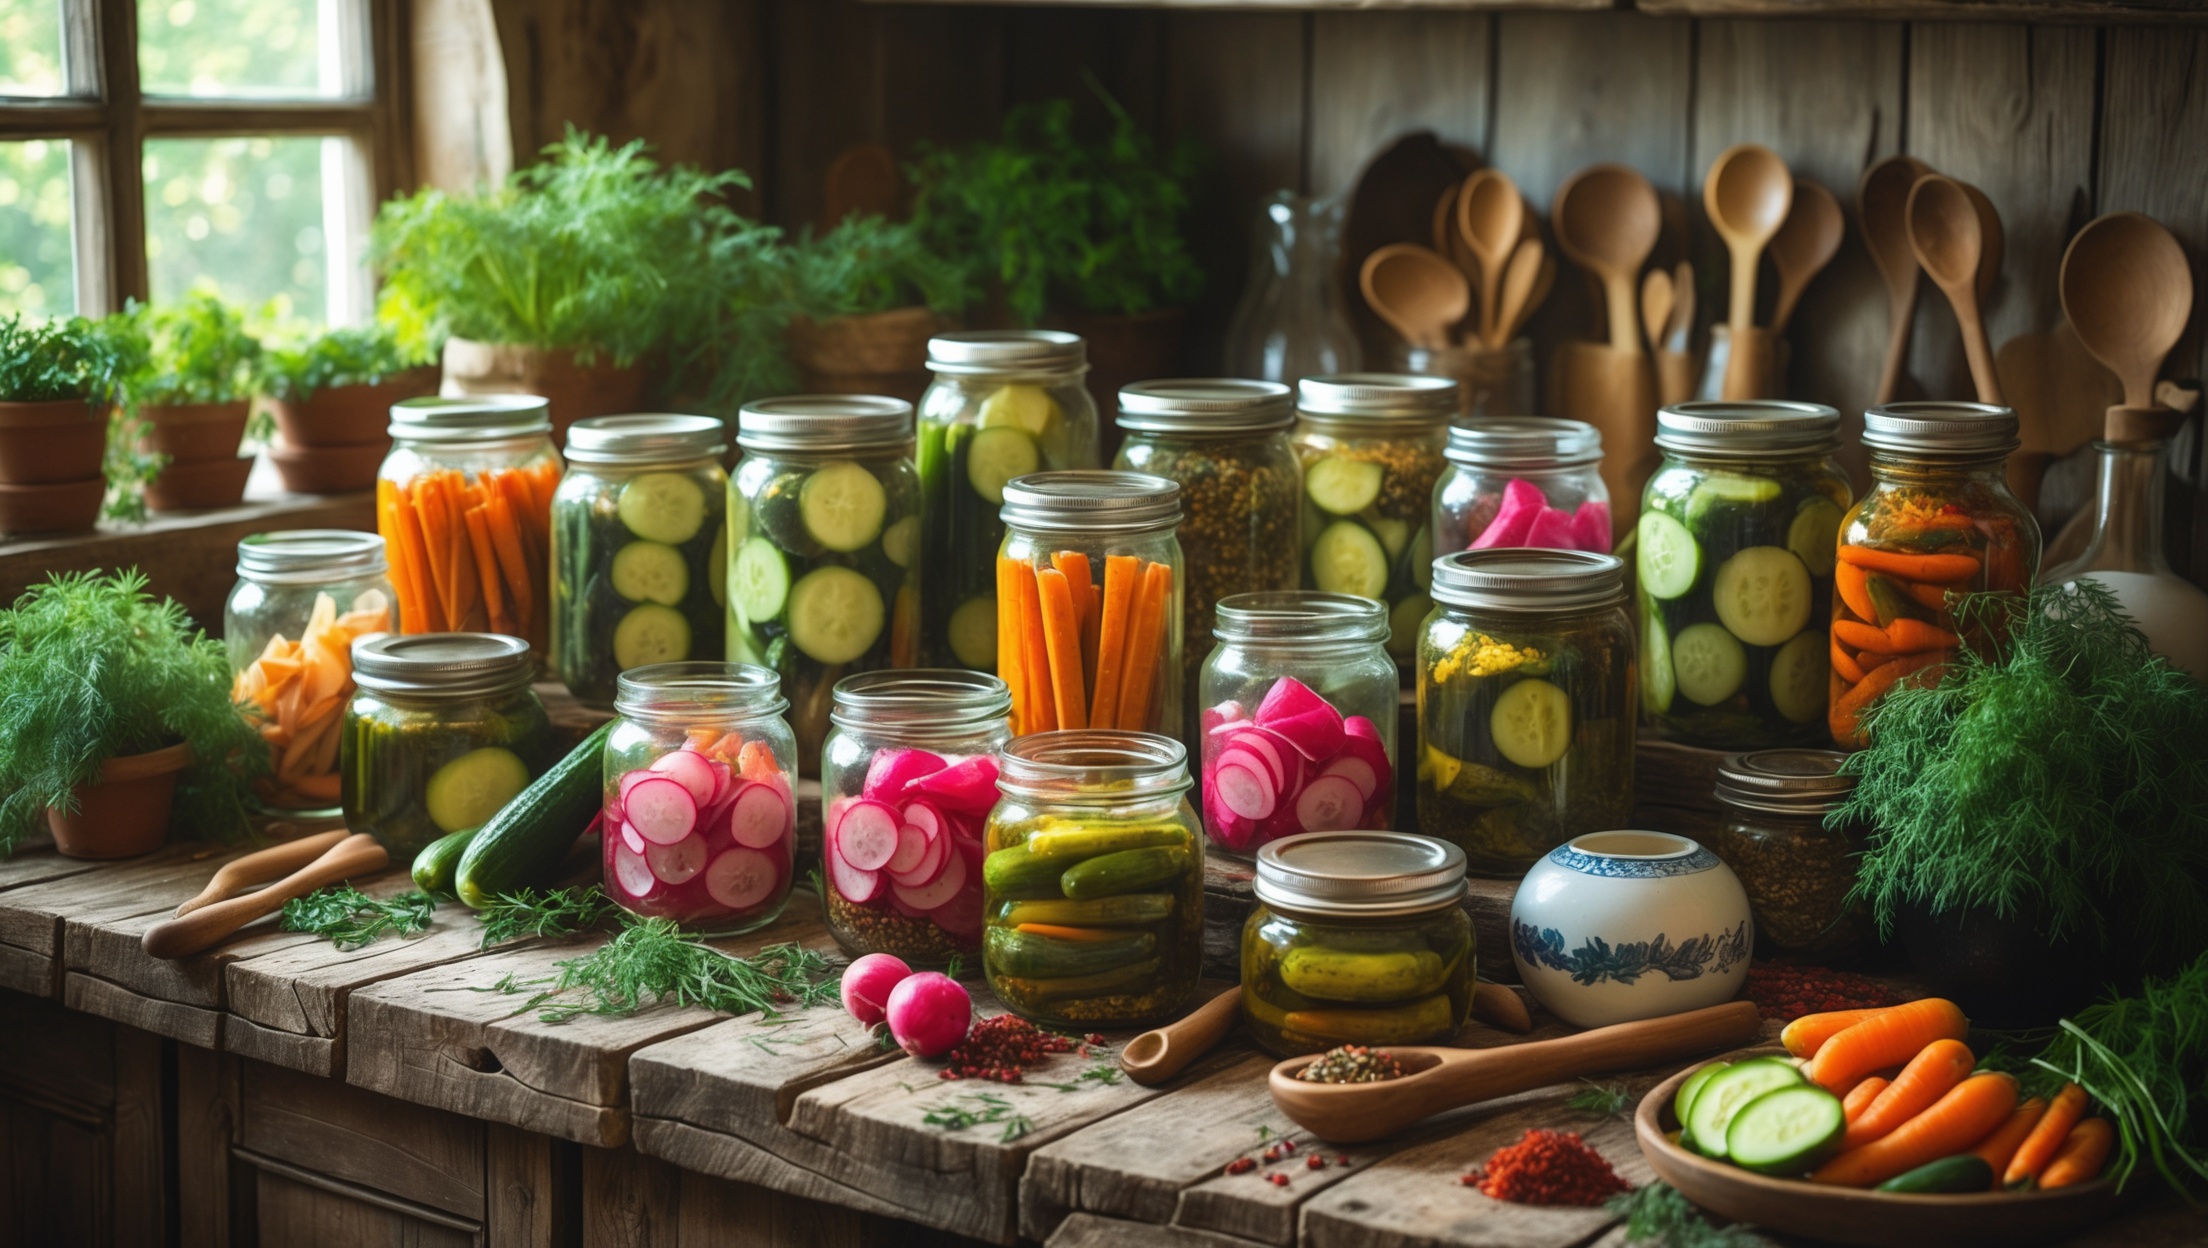
Successful meat curing hinges on the right combination of temperature, humidity, and airflow. Traditional European caves offer naturally cool, humid, and stable conditions—an environment that’s rare in modern homes without intervention. To replicate these conditions:
- Ideal Temperature: 50–60°F (10–16°C)
- Ideal Humidity: 70–80% relative humidity
- Consistent Airflow: Gentle, non-drying circulation
Deviations from these parameters can result in spoilage, undesirable microbial growth, or dried-out meats. The cave’s job is to maintain these variables with precision.
Choosing a Location
Before investing in equipment, assess where your charcuterie cave will reside. Common options include:
- Converted Refrigerators: Upright fridges or freezers modified for temperature and humidity control. Ideal for most home setups.
- Dedicated Pantry or Closet: Insulated, with added environmental controls. Requires more modification but offers greater capacity.
- Basement Corners: Naturally cooler and stable, but often require dehumidification and airflow management.
Factor in proximity to power outlets, ease of cleaning, and accessibility for regular monitoring.
Cost Breakdown and Budgeting
Major Investment Areas
Building a functional charcuterie cave can be scaled to fit your ambitions and budget. Here’s a realistic breakdown of typical expenses:
- Used Refrigerator/Freezer: $75–$200 (check local classifieds or appliance stores)
- Temperature Controller: $40–$80 (plug-in digital thermostats for precise control)
- Humidity Controller: $40–$90 (digital humidistats with outlets)
- Ultrasonic Humidifier: $25–$60 (for adding moisture)
- Small Dehumidifier: $30–$100 (for removing excess humidity)
- Circulation Fan: $10–$30 (low-speed desk fans for airflow)
- Thermo-Hygrometer: $10–$25 (continuous data logging recommended)
- Shelving & Hanging Hardware: $20–$60 (stainless steel preferred for sanitation)
- Cleaning Supplies: $10–$20 (food-safe sanitizer, sponges, cloths)
Total Estimated Cost: $260–$665 (excluding meats and curing ingredients)
Start with the essentials, and upgrade components as your production grows. Always prioritize temperature and humidity control over aesthetic extras.
Recurring Costs
- Electricity: $2–$8/month (depends on fridge efficiency and local rates)
- Replacement Filters & Cleaning: $1–$5/month
- Meats, Casings, and Curing Agents: Varies by batch size and quality
Plan for occasional equipment replacement and factor in the increased value of homemade, artisanal products compared to store-bought equivalents.
Essential Tools & Equipment Guide
Temperature and Humidity Control
- Digital Temperature Controller: Converts a standard fridge or freezer into a precision curing chamber by cycling power based on set points.
- Humidity Controller: Works in tandem with a humidifier and/or dehumidifier to maintain the crucial 70–80% RH range.
- Ultrasonic Humidifier: Adds moisture when levels drop, essential for dry climates or winter months.
- Dehumidifier: Removes excess humidity, especially in damp basements or after loading wet meats.
- Thermo-Hygrometer: Digital models with data logging help spot trends and prevent problems before they start.
Structural & Sanitation Tools
- Shelving: Food-grade wire racks or stainless steel shelves maximize airflow and prevent mold buildup.
- Hanging Hardware: S-hooks, butcher’s twine, and stainless rods for suspending sausages and whole cuts.
- Sanitizing Spray: Food-safe, non-scented cleaners for routine cave and equipment sanitation.
- Gloves & Aprons: For safe handling and easy cleanup.
- Dedicated Brushes & Sponges: Reserved for cave cleaning to avoid cross-contamination.
Optional Upgrades
- UV-C Sterilizing Light: Inhibits surface mold and bacteria, used sparingly to avoid damaging flavor.
- Bluetooth/WiFi Sensors: Remote monitoring for peace of mind when traveling or away from home.
- Backup Power Supply: Protects against outages in regions with unreliable electricity.
Step-by-Step Setup Tutorial
1. Prepare Your Refrigerator or Freezer
Start with a clean, odor-free unit. Remove all plastic shelving and drawers, then sanitize thoroughly using a mild bleach solution (one tablespoon per gallon of water). Rinse and dry completely to prevent off-flavors.
2. Install Temperature Controller
Plug your fridge/freezer into the digital temperature controller, set the target temperature (54°F/12°C is a versatile midpoint), and place the probe inside the unit away from direct airflow.
3. Set Up Humidity Control
Place your humidifier and dehumidifier inside or near the cave. Connect both to the humidity controller (some models allow dual device support). Set the controller to maintain between 75–78% humidity, allowing for a small buffer.
4. Add Circulation and Monitoring
Install a low-speed fan to gently circulate air without directly blowing on meats. Place your thermo-hygrometer at meat level, away from vents or doors. Test the system for 48 hours, recording data every 8–12 hours.
5. Install Shelving and Hanging Hardware
Arrange shelves for optimal spacing (at least 2 inches between items for airflow). Secure rods and S-hooks for hanging whole muscles or sausages. Ensure all surfaces are stable and easy to access for cleaning.
6. Final Sanitation and Dry Run
Sanitize all surfaces again, including hardware. Run the empty cave for several more days, monitoring for temperature and humidity stability. Make adjustments as needed. Only introduce meats when parameters are reliably consistent.
Safety Checklist: Protecting Your Craft and Your Health
Food Safety Fundamentals
- Source Quality Meats: Buy from reputable butchers. Preferably choose cuts labeled for curing or with known provenance.
- Use Curing Salts and Cultures: Always use pink curing salt (Prague Powder #2) and starter cultures for fermented sausages. These inhibit harmful pathogens such as Clostridium botulinum and Listeria.
- Monitor Parameters Daily: Temperature and humidity should be checked at least once every 24 hours—twice is better.
- Control Cross-Contamination: Dedicate all utensils and cleaning supplies to the charcuterie cave. Sanitize before and after every batch.
- Watch for Mold: White powdery mold is generally safe; green, black, or pink molds are not. Remove any suspect meats immediately and clean affected areas.
- Track Aging Times: Label each batch with start date, expected finish, and target weight loss (usually 30–40%).
- Weigh Regularly: Use a digital scale to monitor moisture loss—critical for safety and texture.
- Log Results: Keep a written or digital record of every batch, including recipes, conditions, and outcomes.
Sanitation Protocols
- Sanitize hands and tools before handling meats.
- Clean all surfaces between batches and at least once a month during aging.
- Empty and clean humidifiers/dehumidifiers every week to prevent mold.
- Replace filters and check for mineral buildup on all devices regularly.
Maintenance Best Practices
Weekly Tasks
- Inspect meats for mold, off-odors, and texture changes.
- Empty and rinse humidifier and dehumidifier reservoirs.
- Wipe down fan blades and shelving with food-safe sanitizer.
- Review and log temperature/humidity data.
Monthly Tasks
- Deep clean the entire cave: remove all meats, hardware, and clean every surface.
- Check for signs of equipment wear or malfunction.
- Test backup power sources if used.
- Recalibrate sensors and controllers as needed.
Case Study: From Hobbyist to Charcuterie Maven
Anna’s Journey—Inspired by family traditions and a love of European flavors, Anna set out to build her first home charcuterie cave in a spare basement fridge. Starting with a $300 budget, she sourced used equipment, invested in digital controllers, and spent weeks dialing in the perfect climate. Her first batch—a simple fennel salami—taught her the importance of daily monitoring and strict sanitation. Within six months, she was crafting coppa, pancetta, and bresaola, sharing them with friends and building a small online following. Her advice: “Invest in your tools, track every step, and never compromise on safety. The difference is in the details.”
Common Myths Debunked
- Myth: Any fridge can cure meats. Fact: Standard fridges are too cold and dry. Without proper controllers, results are inconsistent and potentially unsafe.
- Myth: Visible mold always means spoilage. Fact: Some molds are harmless or even beneficial. Learn to distinguish types before discarding a batch.
- Myth: Curing is only for experts. Fact: With the right setup and attention to detail, beginners can reliably make exceptional charcuterie at home.
Conclusion: Elevate Your Culinary Journey
Constructing a home charcuterie cave is more than a technical project—it’s an invitation to deepen your relationship with food, flavor, and tradition. By mastering environmental controls, investing in essential equipment, and maintaining rigorous hygiene, you create a space where the alchemy of time and craft transforms humble cuts into gourmet delicacies. Each batch becomes a testament to your skill, patience, and passion for culinary culture.
Whether you’re savoring a slice of hand-cured lonza at your next gathering or gifting a carefully aged salami to friends, the rewards of your charcuterie cave extend far beyond the kitchen. They’re found in the stories you share, the knowledge you gain, and the legacy you build—one carefully aged masterpiece at a time. Start with the basics, respect the process, and enjoy every savory moment on your journey from novice to artisan. Your charcuterie cave is the gateway to a world of taste, craft, and enduring culinary inspiration.


I’m curious about maintaining the ideal humidity range you mention—how do you handle fluctuations, especially during seasonal changes? Are there specific humidifiers or dehumidifiers you recommend for keeping things stable in a home setup?
Maintaining the ideal humidity, typically between 70-80%, can be tricky with seasonal changes. Many home charcuterie makers use a digital hygrometer to monitor levels closely. For humidity control, a small ultrasonic humidifier works well when the air is dry, and a compact dehumidifier helps if things get too damp. Models from brands like Eva-Dry and Inkbird are popular for their reliability and ease of use in small spaces. Adjusting water trays or sponges can also help fine-tune humidity on a daily basis.
If my house tends to fluctuate in temperature throughout the year, will that make it tough to maintain the recommended 50–60°F and 70–80% humidity levels? How do people usually deal with seasonal changes or drafts in older homes?
Temperature and humidity fluctuations can make it challenging to keep your charcuterie cave within the ideal range, especially in older homes. Many people use a dedicated fridge or wine cooler with an external temperature and humidity controller to regulate conditions precisely. Sealing gaps and insulating the space can help manage drafts. Some also run small humidifiers or dehumidifiers inside the cave to maintain steady humidity year-round.
I noticed you mentioned the importance of maintaining 70–80% relative humidity for proper curing. Can you recommend specific models or types of humidifiers and hygrometers that work reliably in confined cave setups, and are there any common maintenance issues to watch out for?
For small charcuterie caves, ultrasonic or evaporative humidifiers work well because they handle controlled spaces without over-humidifying. The Inkbird IHC200 is a popular humidity controller that pairs nicely with these. For hygrometers, look for digital models like ThermoPro or SensorPush, as they offer accuracy and remote monitoring. Regularly clean humidifiers to prevent mold buildup, and recalibrate hygrometers every few months for best results.
When you mention keeping humidity between 70–80 percent, how do you maintain that level consistently in a home setup? Is there a specific humidifier or device you recommend for beginners who don’t want to overspend?
To maintain 70–80 percent humidity in a home charcuterie cave, many people use a small ultrasonic or cool-mist humidifier connected to a humidity controller, which can automatically turn the humidifier on and off as needed. Popular beginner choices include simple, affordable units like the Inkbird humidity controller paired with any basic tabletop humidifier. Just make sure the humidifier is sized appropriately for your fridge or curing chamber.
I’m curious about airflow. Have you noticed any big differences in mold growth or meat texture based on how strong or where you position your fans inside the cave? Any advice for getting consistent results without over-drying the outer layer?
Airflow makes a significant difference in both mold growth and meat texture. Strong, direct airflow can cause the outside of the meat to dry too quickly, which is known as case hardening. To avoid this, position fans so they promote gentle, even circulation throughout the cave rather than blowing directly on the meat. Placing a fan at a low speed in a corner or using an oscillating fan can help achieve consistent results and minimize patchy mold growth.
Regarding the budget aspect, do you have any insights on how much a basic but safe charcuterie cave setup might cost up front? I’m curious how the initial investment breaks down between environmental controls, shelving, and safety gear.
A basic but safe charcuterie cave setup usually costs between $500 and $1,200 up front. Environmental controls like temperature and humidity regulators tend to be the biggest expense, ranging from $250 to $600. Shelving (stainless or food-safe wood) typically adds another $100 to $300, depending on size and quality. Essential safety gear—such as thermometers, hygrometers, and cleaning supplies—can total $50 to $150. Costs can vary based on your space and equipment choices.
The excerpt mentions targeting a humidity range of 70–80 percent. How do you monitor and adjust humidity levels effectively in a charcuterie cave at home, and are there any common pitfalls first-timers should watch out for when trying to maintain that range?
To monitor humidity, use a digital hygrometer inside the charcuterie cave for accurate readings. To adjust humidity, add a humidifier or trays of water to raise it, and use a dehumidifier or increase airflow to lower it. A common pitfall is neglecting to check humidity daily, which can lead to undesired mold or slow drying. Also, avoid placing the hygrometer too close to humidifiers, as this can give misleading readings.
I noticed the guide emphasizes safety protocols when curing meats at home. Could you elaborate on what specific steps or monitoring systems are considered essential for preventing issues like unwanted bacterial growth or mold, especially for someone starting with limited experience?
Absolutely, safety is key when curing meats. Essential steps include maintaining a stable temperature (typically 50-60°F) and humidity (around 70-80%) using a reliable thermometer and hygrometer. Regularly check and calibrate these devices. Good airflow is also crucial, so use a small fan inside the cave. You should visually inspect your meats daily for any unusual mold (green, black, or fuzzy is bad—white is usually harmless). Finally, always use curing salts as directed in recipes to prevent harmful bacterial growth like botulism.
Can you break down the main costs involved in setting up a basic home charcuterie cave? I want to make sure I’m budgeting for both essential equipment and safety measures, but I’m not sure where it’s okay to save and where to invest.
Setting up a basic home charcuterie cave usually involves costs for a used or new refrigerator or wine fridge (often $150–$500), a temperature and humidity controller ($50–$150 each), a quality hygrometer ($20–$40), and shelving or hooks ($20–$50). For safety, invest in reliable controllers and accurate thermometers, as well as sanitizers and food-safe cleaning supplies. You can save on shelving by using DIY solutions, but never skimp on equipment that monitors or controls temperature and humidity—those are vital for food safety.
I’m curious about airflow in the cave. The article mentions the need for consistent airflow, but how do you actually set that up in a converted fridge or freezer? Is a small fan enough, or do I risk drying out the meats too quickly?
To set up airflow in a converted fridge or freezer, a small computer or USB fan is usually enough. Place the fan so it circulates air gently without blowing directly on the meat, which can cause it to dry out too fast. Aim for slow, indirect movement—just enough to prevent stagnant air and mold, but not so much that the humidity or drying rate spikes. Monitor conditions closely and adjust fan speed or position as needed.
The guide mentions both safety and budget considerations for building a charcuterie cave. Can you provide a rough estimate of what the total startup costs might look like for someone trying this for the first time with just a small batch?
For a small-batch home charcuterie cave, expect startup costs to range from $300 to $700. This includes a used wine fridge or small fridge ($150–$300), humidifier/dehumidifier ($50–$100), temperature and humidity controllers ($60–$100), shelving, fans, and safety essentials like cleaning supplies and food-safe hooks. Prices can vary based on the equipment quality and how much you DIY.
Could you break down the average monthly maintenance costs after the initial setup? I’m trying to plan my budget and want to know what ongoing expenses to expect for equipment operation and food safety supplies.
After you’ve built your home charcuterie cave, the average monthly maintenance costs usually fall between $20 and $50. Most of this goes toward electricity for temperature and humidity controls, as well as replacing filters and hygrometer batteries. You’ll also need to budget for cleaning supplies and occasional replacements for sanitizers and protective gear. These amounts can vary depending on the size of your setup and how often you use it.
You mention the ideal temperature and humidity ranges for curing meats, but I’m curious about how much these can safely fluctuate day-to-day. What kind of monitoring tools do you recommend to keep everything stable in a DIY setup?
Daily temperature and humidity should stay as stable as possible, ideally within 2–3°F and 5% relative humidity of your target range. Brief, minor fluctuations usually aren’t a big problem, but bigger swings can risk spoilage or uneven curing. For reliable monitoring, I recommend using a digital hygrometer/thermometer combo with data logging. Some models even have alarms or WiFi connectivity so you can get alerts if conditions drift out of range.
For someone just starting out, is it better to invest in a dedicated curing chamber right away, or can you achieve reliable results by modifying an old fridge with humidity controls? If you’ve compared both, what are the trade-offs in cost and consistency?
Modifying an old fridge with humidity controls is a popular and budget-friendly way to start home charcuterie. It can yield reliable results if set up carefully, but it may require regular monitoring and adjustments. Dedicated curing chambers are more expensive but offer better consistency and require less hands-on tweaking. If you’re just starting, the fridge modification is a solid way to learn before committing to a larger investment.
You mentioned the importance of consistent airflow in the cave—could you explain how to achieve that at home? Do regular fans work, or is there specific equipment recommended to maintain proper airflow for safety and quality?
To maintain consistent airflow in a home charcuterie cave, small computer fans or low-speed circulation fans are often used since they provide gentle, continuous movement without drying the meats out. It’s important to avoid standard household fans, as they’re usually too powerful and can cause excessive moisture loss. Position the fans so air circulates evenly but doesn’t blow directly on the meat. Monitoring humidity and airflow with sensors also helps ensure you maintain safe and ideal curing conditions.
Can you elaborate on what kind of airflow system is needed for a small home charcuterie cave? Is a basic fan enough, or do more advanced ventilation setups make a noticeable difference in the results?
For a small home charcuterie cave, gentle airflow is important to prevent mold and ensure even drying. A basic fan can work if it circulates air without blowing directly on the meats. However, more advanced systems with adjustable fans and filtered vents provide better control over humidity and minimize contamination risks. If you plan to cure larger batches or want more consistent results, investing in a dedicated air circulation and ventilation setup is worth considering.
If my budget is pretty limited, what would you suggest I prioritize first when setting up a charcuterie cave to ensure both safety and quality in the initial batches?
To make the most of a limited budget, first focus on reliable temperature and humidity control—these are essential for food safety and proper curing. Invest in a good-quality thermometer/hygrometer combo and a way to regulate climate, such as a basic fridge with an external temperature controller. After that, choose food-safe racks and prioritize sanitation supplies. You can gradually upgrade other elements as you go.
If I want to experiment with both beef bresaola and pork salami, is it safe to cure multiple types of meat in the same cave at the same time? Are there special precautions or extra monitoring I should plan for?
Yes, you can cure beef bresaola and pork salami in the same cave, but you need to be extra careful with hygiene and cross-contamination. Make sure each piece is hung with enough space for air circulation and check that both types of meat require similar temperature and humidity. Monitor for mold growth closely, and if you see unusual colors or smells, separate the meats immediately. Always clean tools and surfaces between handling different meats.
I get the importance of airflow, but is there a risk of too much air movement drying out the outer layer of the meats too quickly? How do you strike the right balance between preventing mold and ensuring proper curing?
You’re absolutely right to consider the risk of excessive airflow. Too much air movement can cause the outside of your meats to dry out quickly, leading to case hardening, which traps moisture inside and affects curing. To balance things, aim for gentle, indirect airflow—use a small fan on a low setting and avoid aiming it directly at the meats. Regularly check humidity and adjust as needed to keep the environment optimal for both mold prevention and proper curing.
I’m curious about what kind of home equipment is best for maintaining both the humidity and temperature ranges you mention (50–60°F and 70–80% RH). Are there affordable and reliable devices that handle both, or is it better to combine separate solutions like a modified fridge and a standalone humidifier?
For home charcuterie caves, many people use a modified fridge paired with a standalone humidifier and thermostat/hygrostat controllers to keep both temperature and humidity in the right range. All-in-one units designed for wine or cheese aging exist, but they tend to be expensive. Combining a fridge (with an external thermostat control) and a small humidifier controlled by a humidity controller is a reliable and more budget-friendly option for most home setups.
I see the article mentions maintaining 70–80% humidity for the charcuterie cave. Do you have any recommendations on affordable but reliable humidifiers that work well in small spaces, and how do you keep that level consistent?
For a small charcuterie cave, ultrasonic or cool-mist humidifiers are a good choice since they’re affordable and easy to manage. Brands like TaoTronics and Pure Enrichment offer compact models that fit nicely in limited spaces. To keep humidity steady, use a digital hygrometer to monitor levels and adjust the humidifier’s output as needed. Opening the door less often helps maintain stable conditions, and placing a shallow tray of water inside can also assist in fine-tuning humidity.
If I’m starting this project in a basement that fluctuates between 55 and 65°F depending on the season, would I need to invest in both a cooling and heating unit, or are there more affordable ways to stabilize the temperature year-round?
With basement temperatures ranging from 55 to 65°F, you’re already within the ideal range for most charcuterie. Instead of investing in both a heating and cooling unit, consider adding insulation to reduce fluctuations. A small space heater or a cooling fan may help during extreme swings, but in many cases, insulation and a good thermometer are affordable ways to maintain stability year-round.
You mention that ideal charcuterie cave conditions are 50–60°F with 70–80% humidity. In your experience, what’s the most reliable way to keep humidity in that range, especially during dry winter months in the US? Are there specific humidifier models or methods you recommend that aren’t too pricey?
Maintaining steady humidity in a charcuterie cave can be tricky during dry winters. Many home charcutiers find that a small, adjustable cool-mist humidifier works well—models like the pure Enrichment MistAire or TaoTronics are affordable and reliable. Pairing the humidifier with a digital hygrometer helps you monitor levels accurately. Also, placing shallow trays of water inside the fridge can add extra moisture if needed. Be sure to check and refill water frequently, and clean the humidifier regularly to avoid mold.
In terms of budgeting, can you break down the typical start-up costs for someone looking to create a small-scale charcuterie cave at home? I’d like to know which expenses are essential and where it might be reasonable to save a bit.
For a small-scale home charcuterie cave, the main essential expenses are a dedicated refrigerator or wine fridge (around $200–$500), a humidity and temperature controller ($50–$150), and a small fan ($10–$30). Food-safe racks and trays might add $20–$40. You can often save by buying a used fridge and using affordable DIY monitoring solutions. Optional extras like specialty curing chambers or advanced sensors can raise costs but aren’t strictly necessary for beginners.