
Introduction: The Art and Culture of Seasonal Cheese Boards
There’s a quiet alchemy to a thoughtfully curated cheese board—a tableau where flavor, seasonality, and craftsmanship converge. More than just an appetizer, a cheese board is a canvas for culinary self-expression, a celebration of local terroir, and an invitation to experience the rhythm of the seasons. Whether you’re hosting an intimate gathering or seeking to elevate a weeknight meal, a well-constructed cheese board tells a story of taste and culture. But true excellence isn’t just about piling cheeses and crackers onto a platter. It’s about harmonizing flavors, textures, and colors; balancing the cost with quality; and wielding the right tools to present your creation with flair. In this comprehensive guide, we’ll unravel the secrets to crafting stunning seasonal cheese boards—covering essential cheese and accompaniment selection, budgeting strategies, must-have tools, and practical setup steps. Whether you’re a culinary novice or a seasoned entertainer, you’ll learn how to curate cheese boards that delight the palate and the eye, all while honoring the rhythms of the seasons and the spirit of culinary craft.
Why Seasonality Matters in Cheese Board Curation
The Flavor of the Seasons
Seasonal eating isn’t just for produce—cheese, too, is deeply influenced by the time of year. Factors like animal diet, milk freshness, and traditional production cycles mean that certain cheeses are at their peak in specific seasons. Pairing these with the freshest fruits, nuts, and herbs available amplifies their flavor and celebrates local bounty.
- Spring: Fresh chèvre, young pecorino, and tangy feta pair well with peas, radishes, and early strawberries.
- Summer: Creamy bries, semi-soft cow’s milk cheeses, and washed rinds shine with stone fruits, berries, and crisp cucumbers.
- Autumn: Aged goudas, nutty comtés, and blue cheeses balance persimmons, figs, apples, and toasted nuts.
- Winter: Robust aged cheddars, alpine styles, and triple creams pair beautifully with citrus, dried fruits, and spiced nuts.
Supporting Local and Sustainable Producers
Curating cheese boards seasonally encourages connections with local dairies and farmers’ markets. This practice not only ensures fresher, more flavorful ingredients but also supports sustainable food systems and reduces your culinary carbon footprint.
Building a Balanced Cheese Board: Selection and Pairing Principles
Choosing Cheeses: Flavor, Texture, and Milk Variety
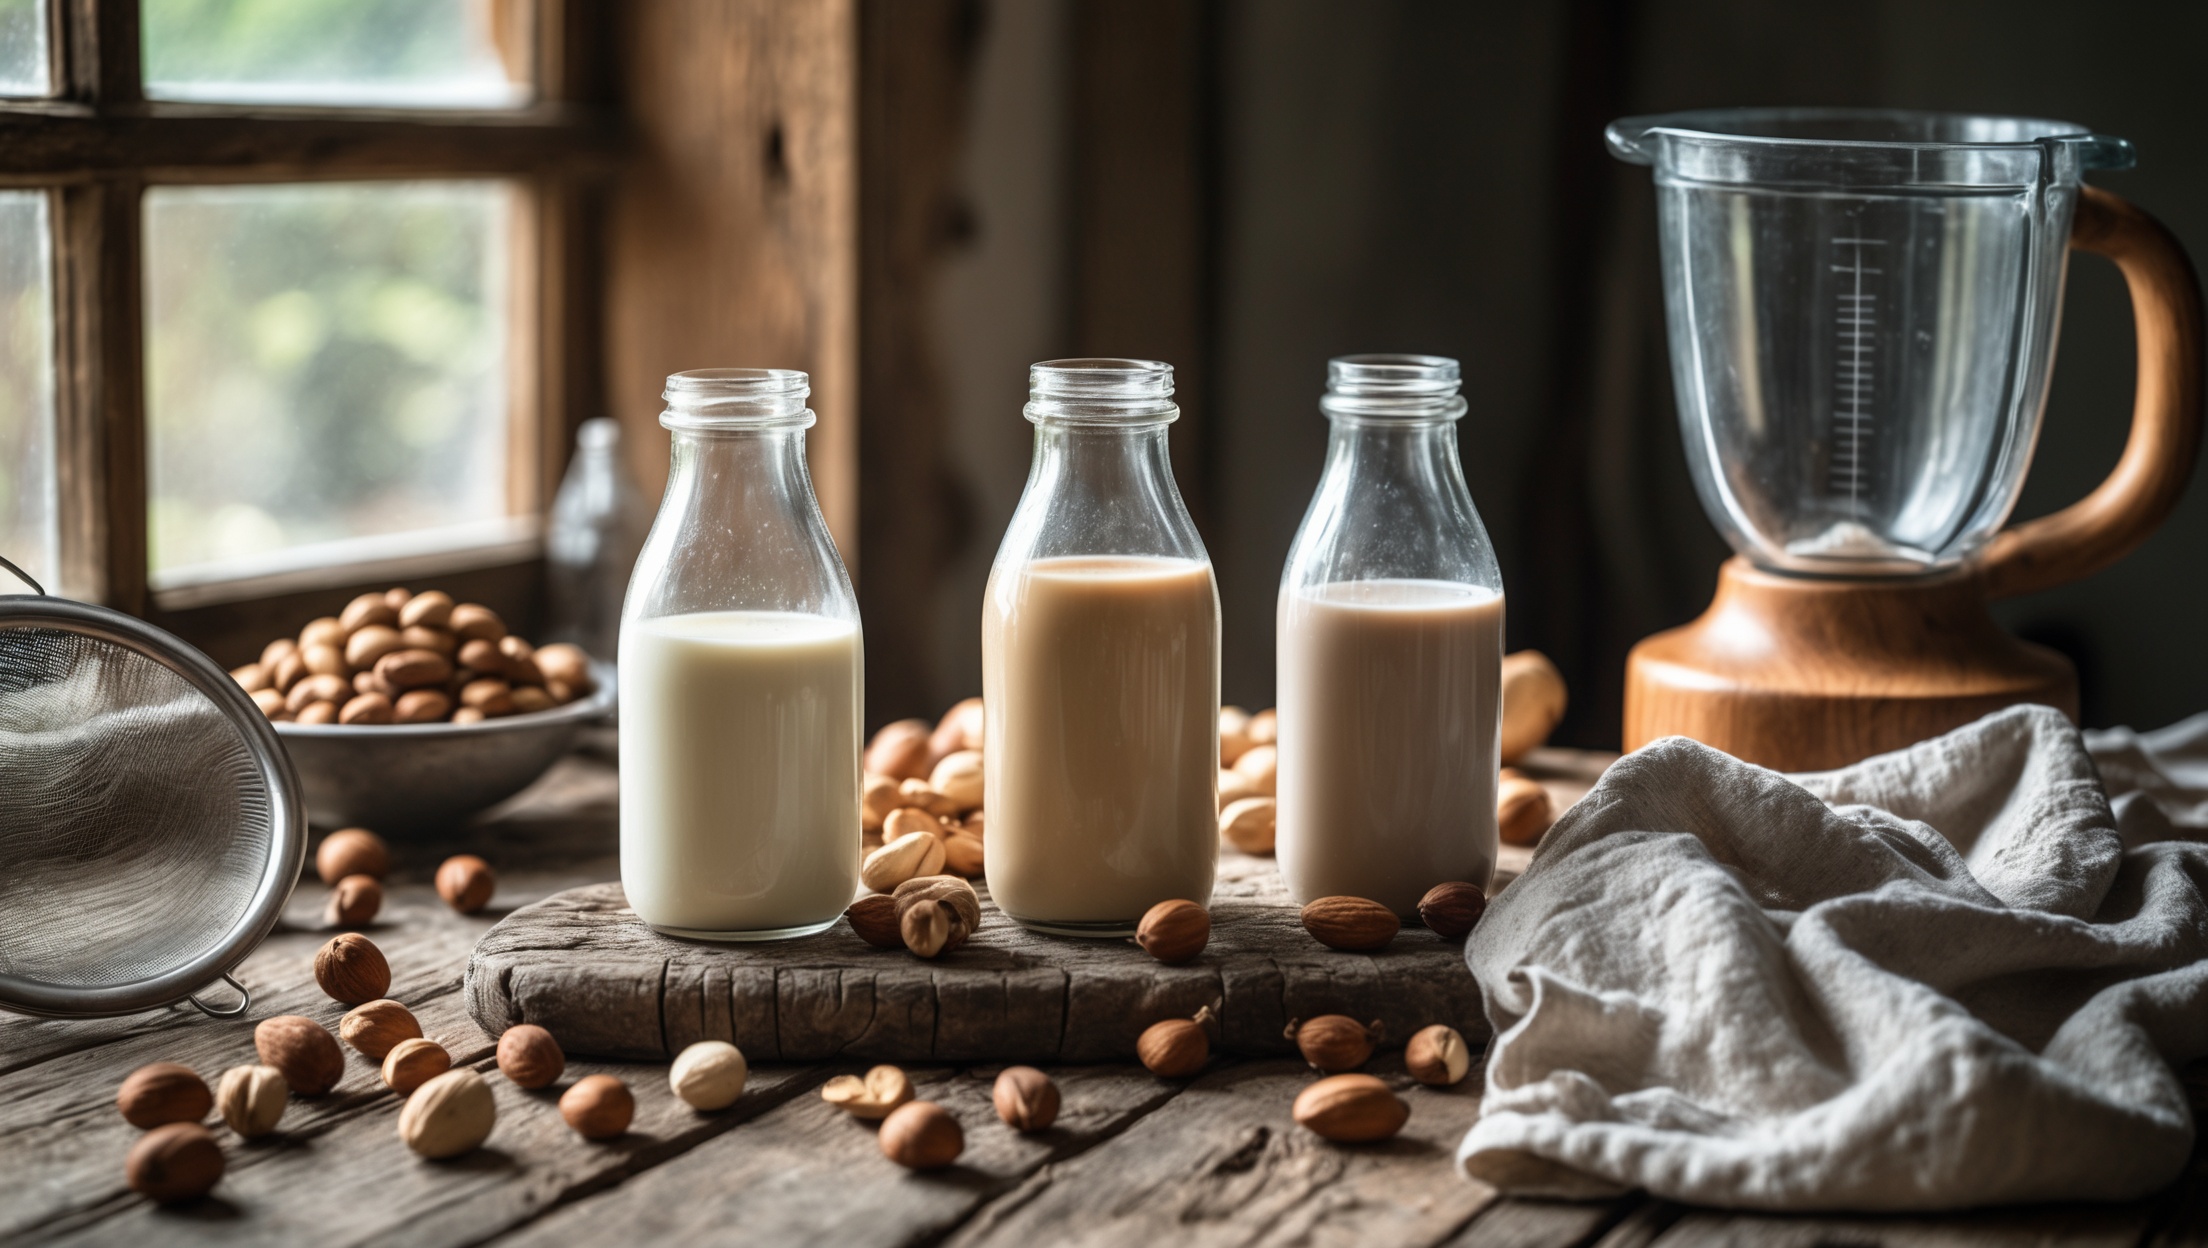
An exceptional cheese board offers diversity—a journey across taste, texture, and provenance. Aim for 3–5 cheeses with distinct profiles:
- Milk Type: Include cow, goat, and sheep milk cheeses for contrast.
- Texture: Offer a range: soft-ripened, semi-soft, firm, and blue.
- Flavor: Balance mild, tangy, nutty, and bold (e.g., a creamy brie, a sharp aged cheddar, a tangy blue, a nutty manchego, and a fresh chèvre).
Seasonal Accompaniments: Beyond Crackers
Seasonal produce and accompaniments elevate each cheese.
- Spring: Snap peas, baby carrots, fresh herbs (tarragon, chives), honeycomb.
- Summer: Cherries, apricots, cucumbers, heirloom tomatoes, basil pesto.
- Autumn: Pears, apples, figs, roasted hazelnuts, quince paste.
- Winter: Citrus segments, candied pecans, dried cranberries, spiced chutney.
Don’t forget textural elements: rustic bread, seeded crackers, and a mix of raw and roasted nuts.
Cost Breakdown: Budgeting for a Cheese Board That Impresses
Setting a Realistic Budget
Cheese boards can be as modest or extravagant as you like, but mindful budgeting ensures you get the most impact for your investment. Here’s a sample cost breakdown for a platter serving 6–8:
- Cheese (3–5 types, 500–700g total): $25–$40
- Accompaniments (fruit, nuts, condiments): $10–$20
- Bread & Crackers: $5–$10
- Garnishes (herbs, edible flowers): $3–$5
- Total: $43–$75
Prioritize quality over quantity. Splurge on one standout cheese, then fill out your board with seasonal produce and pantry staples.
Smart Shopping Tips
- Buy cheeses by weight at the counter to control portions and costs.
- Shop farmers’ markets for seasonal produce deals.
- Seek out in-house bakery breads and day-old deals.
- Use pantry items like nuts, olives, and dried fruit to stretch your budget.
Essential Tools and Equipment for Cheese Board Success
Boards and Platters
The foundation of your presentation is the board itself. Opt for food-safe materials that complement your aesthetic:
- Wood: Classic and rustic; choose hardwoods like maple or acacia.
- Slate: Modern, with the bonus of labeling cheeses using chalk.
- Ceramic/Porcelain: Elegant and easy to clean.
Size matters: allow roughly 50–75 square inches per guest.
Knives and Serving Utensils
- Cheese Knives: A set with a soft cheese knife, hard cheese knife, and spreader covers most needs.
- Small Tongs/Forks: For picking up accompaniments.
- Mini Bowls: For olives, honey, or jams.
- Labels/Tags: For identifying cheeses—especially helpful for guests.
Other Useful Accessories
- Ramekins or shot glasses for honey and dips.
- Edible flowers or fresh herbs for garnish.
- Bread knife for slicing baguettes tableside.
Step-by-Step: Curating and Assembling Your Seasonal Cheese Board
Step 1: Plan Your Palette
Select cheeses and accompaniments based on season, color, and contrast. Sketch a quick layout or gather inspiration images if desired.
Step 2: Prep Ingredients
- Bring cheeses to room temperature (30–60 minutes out of the fridge).
- Slice or crumble cheeses where appropriate; leave some whole for visual interest.
- Wash and dry fruits, chop nuts, and prepare dips or spreads.
Step 3: Arrange with Intention
- Place cheeses first, spacing them apart for easy access.
- Add accompaniments in clusters: fruit, nuts, and condiments between cheeses.
- Fill gaps with crackers, bread, or additional garnish.
- Use height and layers—stack items or nestle bowls for visual appeal.
Step 4: Finish and Serve
- Garnish with fresh herbs or edible flowers.
- Label cheeses and provide appropriate knives.
- Serve immediately or cover lightly with beeswax wrap until ready.
Maintenance and Food Safety Best Practices
Safe Storage and Handling
- Store cheeses in wax paper or breathable wrap to preserve flavor.
- Refrigerate leftovers promptly; soft cheeses should be consumed within 2–3 days.
- Avoid cross-contamination by providing separate knives for blue and other cheeses.
Cleaning and Care for Boards and Tools
- Hand-wash wooden boards and dry immediately to prevent warping.
- Sanitize boards after serving pungent cheeses or raw produce.
- Oil wood boards regularly to maintain their finish and prevent drying.
Case Study: A Seasonal Cheese Board for Autumn Gathering
Picture an early autumn evening: a gathering of friends, golden light, and a cheese board that captures the flavors of the harvest. Here’s how one host crafted an unforgettable spread on a $60 budget for eight guests:
- Cheeses: Aged gouda (nutty, caramel notes), mild blue (creamy, not overpowering), and young goat cheese (bright, tangy).
- Accompaniments: Sliced pears, fresh figs, roasted almonds, quince paste, and honey.
- Bread: Thinly sliced walnut rye and seeded crackers.
- Garnish: Sprigs of rosemary and edible marigold petals.
The host arranged cheeses from mild to bold, filled gaps with fruit and nuts, and offered a local cider. The result: a cheese board that delighted the senses and sparked conversation about local flavors and cheese-making traditions.
Creative Upgrades: Going Beyond the Basics
DIY Condiments and Pairings
- Quick-pickle seasonal vegetables (radishes, carrots) for a tangy accent.
- Infuse honey with thyme or chili for a custom drizzle.
- Whip up a spiced fruit compote to match the season.
Wine, Beer, and Non-Alcoholic Pairings
- Spring: Sauvignon Blanc, wheat beer, or cucumber-mint spritzers.
- Summer: Rosé, farmhouse ales, or berry-infused sparkling waters.
- Autumn: Hard cider, pinot noir, or spiced apple kombucha.
- Winter: Port, imperial stout, or hot mulled pear juice.
Conclusion: Elevate Your Culinary Gatherings with Seasonal Cheese Boards
Crafting a seasonal cheese board is more than assembling a spread—it’s an act of culinary storytelling that honors tradition, local agriculture, and your personal taste. By focusing on seasonality, thoughtful pairings, and mindful budgeting, you transform simple ingredients into a centerpiece that invites conversation, celebration, and lasting memories. Don’t be afraid to experiment: trust your palate, embrace unexpected combinations, and let the rhythm of the seasons inspire your choices. With the right tools, a dash of creativity, and a respect for craftsmanship, your cheese boards will consistently impress—whether you’re entertaining a crowd or savoring a quiet evening at home. As you explore the world of cheese, you’re joining a vibrant community of food lovers who value quality, sustainability, and the joy of sharing good food. Here’s to many delicious seasons ahead—may your boards be bountiful, your flavors harmonious, and your gatherings unforgettable.


I love the idea of building a cheese board around the seasons, but I usually shop at a regular grocery store. Are there any tips for finding seasonal cheeses and accompaniments without having to visit specialty shops or farmers markets?
You can absolutely create a seasonal cheese board using items from your regular grocery store. Look for cheeses labeled with the season, such as spring goat cheese or autumn-aged cheddar. For accompaniments, focus on what’s in the produce section—berries in summer, apples and pears in fall, citrus in winter. Even crackers and nuts often have seasonal varieties. Just check for tags like ‘limited edition’ or ‘seasonal’ to guide your choices.
I’m curious about the practical setup—do you have suggestions for what basic tools are must-haves for a beginner who wants to serve a cheese board that looks impressive but doesn’t require a lot of specialty equipment?
You really don’t need much to create an appealing cheese board! A large wooden or slate board works great as a base. For tools, have a few cheese knives (or butter knives) for different textures, a small fork or tongs for easy serving, and a couple of small bowls for jams or olives. Parchment paper or napkins can add a stylish touch without extra expense.
You mentioned that the right tools make a difference in presenting a cheese board. For someone just starting out, which basic tools are truly essential versus those that are more for advanced presentation or entertaining?
For a beginner, the essentials are a good cheese knife, a small paring knife, and a sturdy board or platter. These will cover most types of cheese and presentation needs. More advanced tools like wire cutters, specialized spreaders, or cheese markers are helpful for entertaining or intricate boards, but they’re not necessary when you’re just starting out.
I’m curious about the budgeting strategies mentioned for cheese boards. When trying to balance quality and cost, are there certain types of cheeses or accompaniments that you recommend prioritizing or swapping out to keep expenses down without sacrificing the seasonal experience?
To balance quality and cost, the article suggests focusing on a few standout cheeses—like one special local or seasonal cheese—and rounding out the board with more affordable options such as aged cheddar or fresh goat cheese. For accompaniments, prioritize seasonal fruits and homemade items (like spiced nuts or roasted veggies) instead of pricier specialty products. This way, you keep things fresh and interesting without overspending.
I’ve noticed that some cheeses taste completely different depending on the time of year. Can you share examples of cheeses that really stand out in flavor during a specific season, especially if I want to highlight local US options?
Absolutely! Many artisan cheeses change with the seasons. Spring and summer cheeses like fresh goat chèvre or sheep’s milk cheeses from the Northeast or California are especially tangy and herbaceous due to animals grazing on lush grasses. In fall and winter, look for aged cow’s milk cheeses from Wisconsin or Vermont—these often develop richer, nuttier flavors as the milk’s fat and protein content changes. Highlighting these seasonal varieties can really make your cheese board unique.
I’m curious about the budgeting strategies you mention for seasonal cheese boards. Do you have any specific tips for stretching my dollar while still featuring high-quality cheeses, especially during months when my favorite varieties might be more expensive?
One way to keep costs down is to choose one standout, high-quality cheese and pair it with more affordable complementary options, like local fresh cheeses or seasonal fruits and nuts. Buying cheese in smaller portions, visiting local markets for deals, and focusing on in-season varieties can also help. You might also try mixing in house-made spreads or crackers to round out the board without overspending.
You list some really interesting pairings for each season. If I want to build a cheese board that works well for a mix of dietary needs—like including vegetarian cheeses or nut-free options—do you have any favorite seasonal swaps that don’t compromise flavor combinations?
Absolutely, you can keep those wonderful seasonal pairings while adapting for different dietary needs. For vegetarian boards, look for cheeses labeled as using vegetable or microbial rennet—many goudas, cheddars, and fresh cheeses fit the bill. For nut-free options, swap nuts for roasted seeds (like pumpkin or sunflower) or dried fruit for texture and sweetness. Pair with fruit preserves or honey for flavor complexity. This way, you keep the balance of sweet, savory, and crunchy without compromising taste.
You mention that cheese itself changes with the seasons due to animal diet and production cycles. If I’m trying to source local cheese for my business, how far in advance should I plan to order to catch certain cheeses at their seasonal peak?
To catch cheeses at their seasonal peak, it’s best to reach out to local producers a few months in advance—usually 2 to 4 months is ideal. This gives you time to learn what will be available, and some cheeses need to age after production. Ask your cheesemakers about their production schedules and reserve your order early for the best selection and freshness.
I’m curious about the budgeting aspect you mentioned. Do you have any tips for prioritizing which cheeses or accompaniments to splurge on versus where it’s okay to go with a more affordable option, especially when trying to highlight seasonal flavors?
When building a seasonal cheese board on a budget, consider splurging on one or two standout cheeses that really showcase the season, like a fresh goat cheese in spring or an aged cheddar in fall. For accompaniments, seasonal fruits and nuts are usually affordable and pack a lot of flavor. Crackers and breads can often be budget-friendly, so it’s fine to choose more economical options there. Prioritize spending on items that will be the centerpiece, and balance the rest with high-quality but less expensive sides.
I’m curious about your budgeting strategies for assembling a cheese board with high-quality, seasonal ingredients. Do you have recommendations for prioritizing where to spend a little more versus where to save without compromising the overall experience?
When assembling a cheese board on a budget, I recommend focusing your spending on one or two standout cheeses—choose something local and in season for the best flavor and value. Pair these with more affordable accompaniments like fresh or dried fruit, nuts, and crackers. You can also save by making dips or spreads at home. Seasonal produce often costs less and adds color and freshness, so prioritize those, while spending a little extra on specialty cheeses or charcuterie to create a memorable centerpiece.
You mention balancing cost with quality when assembling a cheese board. Do you have any tips for prioritizing which elements are worth splurging on versus where it’s okay to save, especially when it comes to accompaniments or the cheese itself?
When building your cheese board, it’s usually best to invest most in the cheese since that’s the centerpiece—choose a couple of high-quality options rather than many average ones. For accompaniments like crackers, nuts, and fruits, you can save by picking simple or seasonal items, or even making some yourself. Fresh produce and basic bread from a local bakery can be both affordable and delicious.
The article mentions must-have tools for setting up a cheese board. Can you recommend which tools are truly essential for a beginner, and which ones are more of a nice-to-have for special occasions?
For beginners, the essentials are a sturdy cheese board, a basic cheese knife set (including a hard cheese knife, a soft cheese spreader, and a fork-tipped knife), and perhaps some small bowls for spreads or nuts. More specialized tools like wire slicers, labels, or decorative picks are nice additions for special occasions but aren’t necessary when you’re just starting out.
When trying to stick to a college student budget, which must-have tools for cheese boards are actually worth buying and which ones can I skip or substitute with kitchen basics?
For a college budget, stick to just a few essentials. A simple cutting board works well as your cheese board. A basic paring knife or chef’s knife substitutes for fancy cheese knives. Toothpicks or butter knives can stand in for spreaders and forks. Items like marble slabs, specialty slicers, or slate labels can be skipped—they’re nice but not necessary for enjoying a great cheese board.
When putting together a cheese board for a small group on a weeknight, how much time should I set aside for shopping and assembling, especially if I want to include both seasonal cheeses and matching accompaniments?
For a small group, plan about 30 minutes for shopping if you know your local stores and have a shopping list that includes your cheeses and accompaniments. Assembling the board itself usually takes 15–20 minutes. If you want to compare options or explore new seasonal items, allow an extra 10–15 minutes at the shop. Altogether, expect around an hour for the full process.
I’m curious about the tools you recommend for setting up a visually appealing cheese board. Are there any affordable options you suggest for small business owners who want to maintain a stylish presentation without investing in expensive specialty equipment?
You can create an attractive cheese board with a few basic, affordable tools. Look for a simple wooden or slate board, which you can often find at home goods stores for a reasonable price. Invest in a set of cheese knives—there are budget-friendly options that still look professional. Small ramekins or glass jars work well for spreads and nuts, and using clean, colorful dish towels or parchment paper adds a stylish touch without extra cost.
I’m just starting to entertain more at home and love the idea of a cheese board, but I’m not sure what basic tools I actually need. Are there a few essential cheese board tools you recommend for beginners, or can I improvise with what I already have in my kitchen?
You can definitely start with what you have in your kitchen. For a beginner cheese board, the essentials are a sturdy cutting board or platter, a couple of small knives (like a paring knife for softer cheeses and a regular dinner knife for harder ones), and a few small bowls or ramekins for spreads or nuts. As you entertain more, you might add specialized cheese knives or labels, but there’s no need to buy everything at once.
I’m curious about your budgeting strategies for seasonal cheese boards. Do you have recommendations for balancing high-quality artisanal cheeses with more affordable options without sacrificing overall flavor and presentation, especially when planning for a larger group?
When planning cheese boards for a large group, try mixing one or two standout artisanal cheeses with quality, affordable selections like aged cheddar, manchego, or gouda. Use seasonal fruits, nuts, and breads to add variety and visual appeal without overspending. Buying cheese in larger pieces or from a local market can also help reduce costs while still ensuring a delicious spread.
You mentioned that cheese seasonality is influenced by animals’ diets and traditional production cycles. If I’m planning a cheese board for a winter party, are there cheeses I should avoid because their flavor isn’t at its peak, or is it more flexible than that?
In winter, some fresh cheeses like goat cheese or lighter sheep’s milk cheeses might be less flavorful, since animals typically graze on preserved feeds rather than fresh pasture. Aged cheeses such as Cheddar, Gruyère, or blue cheeses are great picks in winter, as their flavors mature over time regardless of season. You do have some flexibility—just lean toward aged varieties or those made in autumn, and your cheese board will shine.
The article mentions the importance of using the right tools for presentation. Could you give some examples of essential tools for setting up a cheese board that won’t take up too much space or go over budget for a small café?
For a small café, you can keep things simple yet effective. A sturdy wooden or slate board works well and looks attractive. Essential tools include a small set of cheese knives (one for soft, one for hard cheeses), cheese markers or labels, and a set of tongs or mini serving forks. These items are affordable, easy to store, and help create a neat, inviting display for your guests.
Can you expand a bit on essential tools for setting up a cheese board? I’m wondering which items really make a difference in both presentation and ease of serving, especially for someone who doesn’t entertain often but wants to try this for a small get-together.
For a small gathering, focus on a few key tools for your cheese board. A sturdy wooden or slate board works well for presentation. Use a set of cheese knives: one for soft cheeses, one for hard, and one for spreading. Small forks or toothpicks help guests serve themselves easily. Ramekins or small bowls are handy for accompaniments like nuts or honey. These basics elevate both the look and ease of serving, without requiring a big investment.
What are some must-have tools you recommend for presenting and serving cheese boards at home? I have a basic set of kitchen knives, but I’m wondering if specialized cheese knives or certain platters actually make a big difference in how the cheeses taste or look.
Specialized cheese knives do help, especially for soft, hard, and crumbly cheeses—they keep textures intact and make serving neater. A wooden or slate board gives a nice rustic look and keeps cheeses cool. Small forks or toothpicks help with sampling, and a set of ramekins or small bowls is handy for nuts, honey, or jams. These upgrades really elevate both the look and the tasting experience.
Could you elaborate on the essential tools for setting up a cheese board? I want to know which items are truly necessary for presentation versus those that are just nice to have, to help prioritize my supply purchases.
For a well-presented cheese board, the essentials include a sturdy board or platter, a set of cheese knives (usually one for soft, one for hard cheeses), and small bowls or ramekins for spreads or nuts. Optional items that enhance presentation but aren’t strictly necessary are cheese markers, small tongs, decorative serving spoons, and specialty spreaders. Prioritize the basics, and add extras as your budget allows.
The article mentions using the right tools for presenting a cheese board. What would you consider the most essential tools for a beginner, and are there any budget-friendly alternatives if I don’t have specialized cheese knives or boards?
For beginners, the most essential tools are a sturdy cutting board (wood or even a clean baking sheet works), a simple paring knife, and a butter knife. If you don’t have specialized cheese knives, any sharp kitchen knife can handle most cheeses, while a butter knife is perfect for spreading soft cheeses. Small spoons or forks help with jams and honey, and ramekins or small bowls can hold extras. No need for fancy gear—just use what you have on hand.
I’m pretty new to this, so I’m wondering—are there a couple of must-have tools you’d suggest investing in right away, or can I create a decent cheese board with just basic kitchen items?
You can definitely start with basic kitchen items—just a sharp knife, a small cutting board, and a serving plate are enough for a simple cheese board. If you want to invest in a couple of tools, consider cheese knives for different textures and a cheese plane for softer cheeses. These make serving easier and add a nice touch, but they’re not essential for beginners.
I’m new to assembling cheese boards and I’m a little confused about how to actually balance flavors and textures, especially if I’m on a tight budget. Do you have specific tips for choosing seasonal cheeses and accompaniments that won’t break the bank but still make an impression?
To balance flavors and textures on a budget, pick two to three seasonal cheeses—one soft (like brie or fresh goat cheese), one hard (like aged cheddar), and one with a bold flavor (like blue). Pair them with simple, in-season fruits, toasted nuts, and sliced baguette or crackers. Local farmer’s markets often offer good deals on both cheese and accompaniments. Aim for contrast: creamy with crunchy, tangy with sweet, and mild with bold.
You mention that animal diet and milk freshness impact which cheeses are best at different times of year. How can a beginner actually tell which cheeses are at their seasonal peak in a regular grocery store, or is there a certain label I should be looking for?
In a typical grocery store, seasonal cheese labeling is rare, so it can be tricky to spot peak cheeses just by packaging. Instead, look for local or regional cheeses, as these are more likely to reflect current seasons. Soft cheeses like goat cheese and fresh mozzarella are often best in spring and summer, while hard cheeses like aged cheddars peak in fall and winter. If you’re unsure, ask the cheese counter staff—they can usually point out what’s freshest or just arrived.
Balancing cost with quality is always tricky for small businesses. Do you have specific tips for finding high-quality, seasonal cheeses at a reasonable price point, especially when local artisan options can get pretty pricey?
One approach is to work directly with local cheesemakers to see if they offer wholesale rates or offcuts at a discount. Farmers’ markets can also have deals on seasonal cheeses if you shop near closing time. Consider blending a few artisan selections with high-quality, more affordable classics like aged cheddars or goudas to strike a balance between flavor and budget.
When trying to balance cost and quality for a cheese board, are there particular styles or types of cheese that offer the most flavor impact for the price? I’d love to hear recommendations for curating a budget-friendly board that still feels special.
For a budget-friendly but flavorful cheese board, consider cheeses like aged cheddar, gouda, and chèvre (goat cheese). These styles pack bold flavors without a high price tag. Add in a blue cheese or a wedge of brie for variety—they’re often available in small, affordable portions. Shop for wedges instead of pre-sliced or specialty rounds, and include seasonal fruits and nuts to elevate the board without extra expense.
I’m new to entertaining and a bit overwhelmed by all the tools mentioned for setting up a cheese board. What are the absolute basics I can start with, and are there any simple alternatives to specialty cheese knives or boards?
To start, all you really need is a sturdy cutting board or a large plate and a regular kitchen knife—no need for specialty cheese boards or knives right away. Use any small spoons or forks you have for serving spreads or accompaniments. As you get more comfortable, you can add more tools, but these basics will work perfectly for your first gatherings.
When you talk about essential tools for setting up a cheese board, what are the must-haves for someone just getting started? Are there any affordable alternatives to specialty cheese knives or boards that still look nice for guests?
For starters, you’ll want a sturdy cutting board or a large wooden platter—no need for a fancy cheese board. For serving, butter knives, steak knives, or even regular table knives work fine instead of specialty cheese knives. Small bowls or ramekins for spreads and nuts, plus a few cocktail picks or toothpicks, help complete the setup. Simple glass or ceramic dishes can make everything look inviting without breaking the bank.
The article mentions that the season influences not just the accompaniments but also the actual flavor of cheeses due to factors like animal diet. Are there certain cheese types or regions in the US where this seasonal difference is more noticeable, and how do you find out when your local cheese is at its seasonal peak?
Seasonal differences are especially noticeable in cheeses made from raw milk and on smaller farms, where animals graze on fresh, varied forage. Regions like Vermont, Wisconsin, and California often produce such cheeses. To find out when local cheese is at its peak, ask your cheesemonger or local farmers’ market vendors—they usually know when their cheeses best reflect the season’s flavors.
I noticed you mentioned budgeting strategies for cheese boards. Do you have any tips on finding high-quality, seasonal cheeses at a reasonable price, especially in regions where local options are limited or tend to be expensive?
If local cheeses are scarce or pricey, try larger supermarkets, which often stock imported cheeses at better prices. Look for sales or ask the deli counter about end-of-batch specials. Shopping at farmers’ markets near closing time can yield discounts too. Choosing seasonal cheeses helps, as they’re usually less expensive when abundant. Consider splitting bulk purchases with friends to lower costs, and don’t be afraid to sample lesser-known varieties that offer great flavor without the premium price.